Vinyl Siding Care A Complete Guide

Vinyl siding care is crucial for maintaining your home’s curb appeal and protecting your investment. This guide dives into everything you need to know, from basic cleaning techniques to tackling more serious issues like cracks and mildew. We’ll cover various cleaning methods, preventative measures, and repair strategies, ensuring your vinyl siding stays looking its best for years to come. Get ready to learn how to keep your home’s exterior shining!
We’ll explore the different types of vinyl siding, their pros and cons, and how to choose the right cleaning products and methods to avoid damage. From regular maintenance checklists to tackling stubborn stains and repairs, this comprehensive guide will equip you with the knowledge and confidence to keep your vinyl siding in top condition.
Introduction to Vinyl Siding
Source: cloudinary.com
Vinyl siding is a popular exterior cladding choice for homes, offering a blend of durability, affordability, and low maintenance. It’s essentially a plastic material, primarily composed of polyvinyl chloride (PVC), a versatile thermoplastic polymer known for its weather resistance and longevity. This composition allows for a wide range of colors and textures, mimicking the appearance of more expensive materials like wood or stone, without the associated upkeep.
Vinyl siding’s advantages over other materials are numerous. Compared to wood, it requires significantly less maintenance – no painting, staining, or caulking is needed. Unlike wood, it’s also highly resistant to rot, insect infestation, and water damage. When compared to aluminum siding, vinyl is generally more impact-resistant and offers superior insulation properties, contributing to energy efficiency. While the initial cost might be slightly higher than some other options, the long-term savings in maintenance and energy costs often make it a cost-effective choice.
Vinyl Siding Profiles
Vinyl siding comes in a variety of profiles, each offering a distinct aesthetic. These profiles impact the overall look of the house, affecting how light and shadow play across the surface. The choice of profile often depends on personal preference and the architectural style of the home.
- Dutch Lap: This classic profile features a slightly overlapping design, mimicking the look of traditional wooden clapboard. The variation in shadow lines adds depth and texture to the siding.
- Beaded: Characterized by a small, raised bead along each panel’s edge, this profile provides a more traditional and slightly more ornate appearance. The bead creates a subtle visual separation between each panel.
- Shake: Designed to resemble wood shakes, this profile has a rougher, more textured surface. This creates a rustic and natural look, often preferred for homes with a more informal or country style.
- Vertical: Unlike the horizontal profiles, vertical siding runs from top to bottom. This style can create a more modern and sleek appearance, particularly on contemporary homes. It can also help to visually lengthen the appearance of a building.
Regular Cleaning and Maintenance

Source: refinedexteriors.com
Keeping your vinyl siding looking its best isn’t rocket science, but it does require some regular attention. A little preventative care goes a long way in extending the life of your siding and maintaining your home’s curb appeal. This section will guide you through effective cleaning methods and a simple maintenance checklist.
Cleaning Vinyl Siding: A Step-by-Step Guide
Cleaning your vinyl siding is best done twice a year, once in the spring and once in the fall. This helps remove dirt, grime, and any potential mildew buildup that may have occurred over the colder months. Choose a day that is neither too hot nor too cold, and preferably overcast to prevent the cleaning solution from drying too quickly.
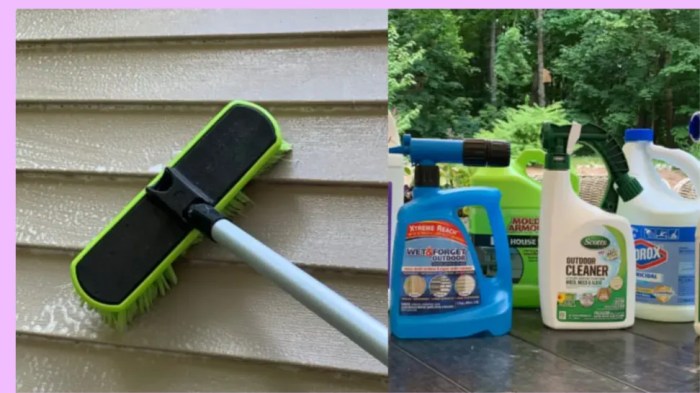
- Preparation: Before you begin, gather your supplies. This includes a garden hose with a nozzle, a soft-bristled brush (or a soft wash brush), a bucket, a cleaning solution (more on that below), and safety glasses. If using a pressure washer, ensure you have the appropriate nozzle and understand its operation. Always protect your plants and landscaping from the cleaning solution.
- Pre-Rinse: Thoroughly rinse the entire siding surface with your garden hose to remove loose dirt and debris. This prevents scratching the siding during the cleaning process.
- Cleaning Solution: For most situations, a simple solution of mild dish soap and water is sufficient. Mix a few drops of dish soap into a bucket of water. For tougher stains or mildew, consider a solution specifically designed for vinyl siding cleaning, available at most home improvement stores. Always test any cleaning solution on a small, inconspicuous area first to ensure it doesn’t damage the siding.
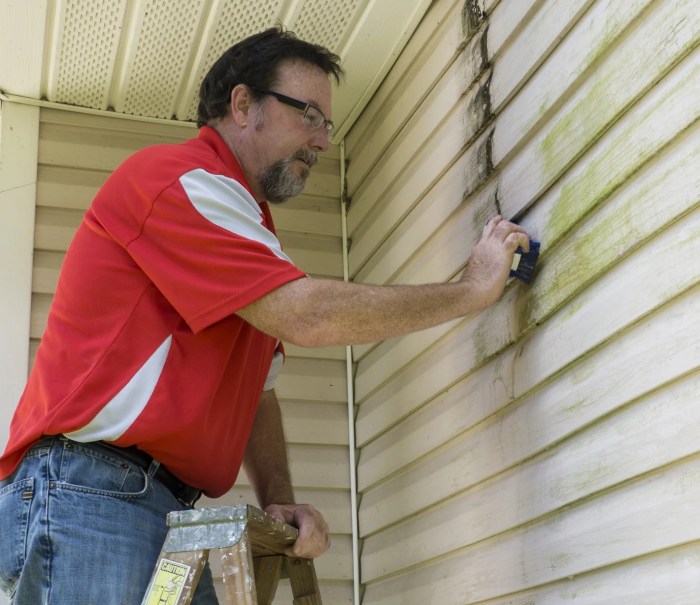
- Cleaning: Using your soft-bristled brush or a soft wash system, gently scrub the siding from top to bottom, working in sections. Rinse each section thoroughly as you go. Avoid using abrasive cleaners or brushes, as these can scratch the vinyl. If using a pressure washer, maintain a safe distance from the siding (typically 12-18 inches) and use a low-pressure setting. Direct the spray from the bottom upwards to prevent water from seeping behind the siding.
- Final Rinse: Once the entire surface has been cleaned, give it a final rinse with clean water to remove all traces of the cleaning solution. Allow the siding to air dry completely.
Vinyl Siding Maintenance Checklist
Regular maintenance helps prevent costly repairs down the line. This checklist includes essential tasks to perform at least twice a year:
- Inspect siding for damage, such as cracks, holes, or loose panels.
- Clean siding using the methods described above.
- Check caulking around windows and doors for cracks or gaps and recaulk as needed.
- Inspect gutters and downspouts for clogs and ensure proper drainage to prevent water damage.
- Trim back any overgrown vegetation that’s touching the siding.
- Check for and repair any loose or damaged flashing around vents and other openings.
Preventing Mildew and Algae Growth
Mildew and algae are common problems for vinyl siding, especially in humid climates. These organisms thrive in damp, shady areas.
To prevent their growth, ensure proper ventilation around your home. Trim back trees and shrubs to allow for good airflow and sunlight. Regularly clean your gutters and downspouts to prevent water from pooling against the siding. Consider using a mildew-resistant cleaner during your regular cleaning routine. For severe mildew or algae infestations, a professional cleaning may be necessary.
Addressing Specific Problems
Vinyl siding is remarkably durable, but even the toughest materials can succumb to damage over time. Knowing how to identify and address common issues will help keep your home looking its best and extend the life of your siding. This section covers minor repairs, stain removal, and dealing with more significant problems like peeling or blistering.
Minor Damage Repair
Minor cracks and dents are common occurrences, often caused by impacts from flying debris or accidental bumps. Small cracks can often be filled with a high-quality vinyl caulk specifically designed for exterior use. Choose a caulk that closely matches the color of your siding for a seamless repair. For dents, you might be able to gently coax the dent back into shape by carefully applying heat with a hairdryer (avoiding direct flame contact) and then gently pressing the dent from behind. Always test any repair method on an inconspicuous area first. Larger cracks or dents may require professional repair or even replacement of the damaged siding panel.
Stain Removal from Vinyl Siding
Various substances can stain vinyl siding, from grease splatters to paint spills. For grease stains, a solution of mild dish soap and water often suffices. Apply the solution with a soft brush, scrub gently, and rinse thoroughly with clean water. Stubborn stains may require a stronger solution, such as a mixture of trisodium phosphate (TSP) and water (always follow the manufacturer’s instructions carefully and wear appropriate protective gear). For paint stains, try carefully scraping off the excess paint with a plastic putty knife. Then, apply a commercial paint remover specifically designed for vinyl siding, following the product instructions diligently. Remember to test any cleaning solution on an inconspicuous area before applying it to the entire surface.
Dealing with Peeling or Blistering Vinyl Siding
Peeling or blistering siding is a more serious problem, often indicating moisture intrusion behind the siding. This can be caused by improper installation, damage to the underlying sheathing, or lack of adequate ventilation. Unfortunately, small areas of peeling or blistering are usually difficult to repair effectively. The best approach is often to replace the affected siding panels. This involves carefully removing the damaged panels, addressing any underlying moisture issues (such as repairing damaged sheathing or improving ventilation), and installing new panels.
| Problem | Solution | Prevention |
|---|---|---|
| Cracks | Fill with exterior-grade vinyl caulk matching siding color. For larger cracks, panel replacement may be necessary. | Regular inspection for damage; address minor cracks promptly; avoid impacts. |
| Dents | Gently heat with a hairdryer and carefully press the dent back into shape from behind. For severe dents, panel replacement may be needed. | Install protective barriers (e.g., shrubbery) to reduce impact from debris. |
| Grease Stains | Clean with mild dish soap and water; for stubborn stains, use a solution of TSP and water (follow instructions carefully). | Regular cleaning to prevent grease buildup. |
| Paint Stains | Carefully scrape off excess paint; use a commercial paint remover specifically for vinyl siding (follow instructions). | Protect siding during painting projects using drop cloths and masking tape. |
| Peeling/Blistering | Replace affected siding panels; address underlying moisture issues (e.g., repair sheathing, improve ventilation). | Ensure proper installation; maintain adequate ventilation; address moisture problems promptly. |
Protecting Vinyl Siding from the Elements: Vinyl Siding Care
Vinyl siding, while durable, needs protection from harsh weather to maintain its appearance and longevity. Extreme temperatures, intense sunlight, and impacts from hail can all cause damage. Proper maintenance, including regular cleaning and strategic protection, significantly extends the life of your siding.
Protecting your vinyl siding from the elements involves a multi-pronged approach focusing on mitigating the effects of sun, snow, ice, and hail, as well as preventing water damage through proper gutter maintenance. This preventative care will save you money and headaches in the long run.
Sun Exposure and UV Degradation
Prolonged exposure to intense sunlight causes UV degradation, leading to fading and cracking of the vinyl. This is particularly noticeable on south-facing walls. While you can’t eliminate sunlight, you can minimize its impact. Planting deciduous trees strategically can provide shade during the hottest parts of the day, reducing direct sun exposure. Consider using awnings or overhangs to provide additional protection for particularly vulnerable areas. These measures help to prevent premature fading and maintain the siding’s color vibrancy.
Snow and Ice Accumulation
Heavy snow and ice can put stress on the siding, potentially causing damage. Regularly removing snow and ice buildup prevents warping and cracking. Be gentle to avoid scratching the surface. Use a soft broom or brush to remove snow, and avoid using metal tools that could cause damage. For ice, you can use a de-icing product specifically designed for vinyl siding, but always follow the manufacturer’s instructions carefully. Never use a sharp object to chip away ice, as this will almost certainly damage the siding.
Hail Damage Prevention
Hailstones can cause significant damage to vinyl siding, leaving dents and cracks. Unfortunately, there’s limited protection against hailstorms other than ensuring your home’s overall structure is sound. If hail damage occurs, it’s best to contact a professional for repair or replacement. Homeowners insurance often covers hail damage to siding.
Gutter Maintenance and Water Damage
Proper gutter maintenance is crucial for protecting your vinyl siding. Clogged gutters can lead to water overflowing and running down the side of your house, causing damage to the siding and foundation. Regularly clean your gutters, removing leaves, debris, and other obstructions. Ensure gutters are properly sloped to allow for efficient water drainage. Consider installing gutter guards to minimize the frequency of cleaning. Promptly repair any leaks or damage to your gutters to prevent water from accumulating and damaging your siding.
Choosing Appropriate Cleaning Products
Using harsh chemicals or abrasive cleaners can damage the vinyl siding’s finish. Avoid using chlorine bleach, ammonia-based cleaners, or strong solvents. Instead, opt for a mild detergent solution mixed with water. A soft-bristled brush or sponge is recommended for cleaning. Always test any cleaning solution on a small, inconspicuous area first to ensure it doesn’t cause discoloration or damage. After cleaning, rinse the siding thoroughly with water to remove any remaining residue. Regular, gentle cleaning with the appropriate products will keep your siding looking its best.
Long-Term Care and Repair Strategies
Source: o0bc.com
Keeping your vinyl siding looking its best involves more than just occasional cleaning. A proactive approach to long-term care and timely repairs will significantly extend its lifespan and maintain your home’s curb appeal. This section includes articles on a maintenance schedule and guides for repairing damaged panels.
Vinyl Siding Maintenance Schedule, Vinyl Siding Care
A regular maintenance schedule is key to preventing small problems from becoming costly repairs. This schedule incorporates both routine cleaning and inspections to catch issues early.
| Task | Frequency | Details |
|---|---|---|
| Cleaning (see previous section) | Twice yearly (spring and fall) | Focus on removing dirt, debris, and cobwebs. |
| Inspection | Twice yearly (spring and fall) | Check for loose or damaged panels, cracks, and signs of water damage. Pay close attention to areas around windows and doors. |
| Caulk Replacement | Every 2-3 years | Inspect and replace any cracked or deteriorated caulking around windows, doors, and other areas where siding meets other building materials. |
| Full Inspection and Potential Repairs | Every 5-7 years | A more thorough inspection by a professional may be warranted to identify any underlying issues or address potential problems before they escalate. |
Replacing Damaged Vinyl Siding Panels
Replacing a damaged panel is a relatively straightforward DIY project for many homeowners. However, it’s crucial to follow the correct procedure to ensure a watertight and aesthetically pleasing repair.
The process typically involves carefully removing the damaged panel, usually by prying it loose from the fasteners. Then, you’ll install a new panel, ensuring it’s properly aligned and fastened securely. It’s essential to match the color and style of the replacement panel to the existing siding. If you are unsure about any part of the process, consulting a professional siding installer is recommended. For instance, replacing a panel near a corner or around a window might require more expertise than a straightforward replacement in the middle of a wall.
Repairing Larger Areas of Damaged Siding
Larger areas of damage, such as those caused by severe weather or impact, may require more extensive repair methods. These can range from replacing multiple panels to more involved repairs that might require professional assistance.
One approach involves using vinyl siding repair patches. These are designed to adhere to damaged areas and blend seamlessly with the existing siding. These are best suited for minor cracks or holes. For more extensive damage, section repair, where a section of siding is replaced, is a better solution. This is often the preferred method for damage spanning multiple panels or involving significant structural issues. In cases of extensive damage, full replacement of a siding section or even the entire wall may be the most cost-effective and long-lasting solution. For example, significant damage from a hurricane or a large falling tree branch might require a complete section replacement or even a whole-wall resurfacing.
Illustrative Examples of Vinyl Siding Care
Let’s look at some real-world scenarios to solidify your understanding of vinyl siding care. These examples cover common issues and their solutions, helping you maintain your home’s exterior for years to come.
Cleaning Heavily Soiled Siding
Heavily soiled vinyl siding often requires more than a simple wash. Persistent dirt, grime, and mildew can necessitate a more thorough cleaning approach. This involves using a stronger cleaning solution and potentially a pressure washer. However, caution is paramount to avoid damaging the siding.
First, pre-treat the siding with a solution of mild detergent and water. Use a soft-bristled brush or a long-handled scrub brush to gently loosen the dirt. For stubborn stains, consider a mixture of chlorine bleach and water (always follow the manufacturer’s instructions on dilution ratios – a typical ratio is one part bleach to three parts water), but test it on an inconspicuous area first. After scrubbing, rinse thoroughly with a garden hose or pressure washer, ensuring you maintain a safe distance and angle (see the illustration below). Allow the siding to air dry completely.
Repairing a Small Crack
Small cracks in vinyl siding are relatively easy to repair, preventing further damage and maintaining the home’s aesthetic appeal. For minor cracks, you can often use a high-quality vinyl caulk designed specifically for exterior use. Before applying the caulk, clean the area thoroughly to remove any dirt or debris. Apply the caulk neatly, smoothing it out with a wet finger or putty knife. Allow the caulk to dry completely according to the manufacturer’s instructions. Once dry, the repair should be virtually invisible. For larger cracks or significant damage, consider consulting a professional siding repair contractor.
Preventing Mildew Growth
Mildew thrives in damp, shady areas. To prevent its growth on your vinyl siding, regular cleaning is crucial. Proper ventilation around your home is also essential, allowing for air circulation and reducing moisture buildup. Trim overhanging branches and shrubs to improve airflow and sunlight exposure to the siding. Consider using a mildew-resistant cleaner specifically formulated for vinyl siding. Regularly inspect your siding, paying close attention to areas prone to mildew, such as north-facing walls or areas with poor drainage. Early detection and treatment are key to preventing extensive mildew growth.
Pressure Washer Usage Illustration
Imagine a pressure washer nozzle. Now, picture a line extending from the nozzle, representing the spray. The ideal angle is approximately 30-45 degrees from the surface of the siding. Hold the nozzle at a distance of approximately 12-18 inches from the siding. This prevents excessive pressure that can damage the vinyl.
Avoid holding the nozzle too close or at a perpendicular angle, as this can lead to gouges or pitting in the siding. Always use a fan-shaped nozzle for wider coverage and less concentrated pressure.
Closure
Maintaining your vinyl siding doesn’t have to be a daunting task. By following the simple steps and preventative measures outlined in this guide, you can significantly extend the lifespan of your siding and maintain your home’s beauty. Remember, regular cleaning and prompt attention to minor issues will prevent larger, more costly problems down the line. So, grab your cleaning supplies, and let’s keep that siding sparkling!
Comments are closed.