Pressure Washing Vinyl Siding A Complete Guide
Pressure washing vinyl siding might seem straightforward, but getting it right means the difference between a sparkling clean exterior and potential damage. This guide dives into the essential steps, safety precautions, and best practices to ensure your vinyl siding looks its best without causing harm. We’ll cover everything from choosing the right equipment and cleaning solutions to mastering effective techniques and performing post-cleaning maintenance. Let’s get started!
Properly cleaning vinyl siding enhances its curb appeal and protects it from long-term damage. Understanding the nuances of pressure washing, including pressure levels, cleaning solutions, and nozzle selection, is key to achieving professional-looking results. Ignoring these details can lead to costly repairs, so let’s learn how to do it right.
Safety Precautions for Pressure Washing Vinyl Siding

Source: whatisvinyl.com
Pressure washing vinyl siding can dramatically improve its appearance, but safety should always be your top priority. Failing to take proper precautions can lead to injury or damage to your property. This section contains crucial safety measures to ensure a successful and safe cleaning.
Personal Protective Equipment (PPE)
Proper personal protective equipment is essential to protect yourself from potential hazards during pressure washing. The following table details the necessary PPE and its importance.
| PPE Item | Purpose | Safety Considerations |
|---|---|---|
| Safety Glasses or Goggles | Protect eyes from flying debris, chemicals, and high-pressure water spray. | Ensure a snug fit to prevent water or debris from entering. Consider impact-resistant goggles for added protection. |
| Hearing Protection (Ear Plugs or Muffs) | Protect hearing from the loud noise generated by the pressure washer. | Choose appropriate protection based on the noise level of your pressure washer. Ensure a proper fit for effective noise reduction. |
| Gloves (Rubber or Nitrile) | Protect hands from chemicals, abrasives, and potential cuts. | Choose gloves that are resistant to chemicals used in cleaning solutions. Ensure the gloves are appropriately sized for comfort and dexterity. |
| Closed-Toe Shoes | Protect feet from potential slips, falls, and dropped objects. | Avoid wearing sandals or open-toed shoes. Consider steel-toe boots for added protection against dropped objects. |
Adjusting Water Pressure for Different Siding Conditions
The water pressure used should be adjusted based on the condition of the vinyl siding and the level of dirt or grime present. Using excessive pressure can damage the siding, causing cracks or warping.
Using a pressure washer with a pressure adjustment feature, begin with the lowest setting and gradually increase as needed. For lightly soiled siding, a pressure setting between 1500-2000 PSI is usually sufficient. Heavily soiled siding might require up to 2500 PSI, but always test a small, inconspicuous area first. For older or more delicate siding, use the lowest possible pressure setting and increase gradually, monitoring for any signs of damage. Always maintain a safe distance from the surface (around 12-18 inches).
Potential Hazards and Mitigation
Several hazards are associated with pressure washing vinyl siding. Understanding these risks and implementing appropriate mitigation strategies is vital.
High-pressure water can damage the siding if used incorrectly. This can be mitigated by using the appropriate pressure settings and maintaining a safe distance from the surface. Overuse of cleaning chemicals can also damage the siding and harm the environment. Use only environmentally friendly cleaning solutions and follow the manufacturer’s instructions carefully. Finally, the equipment itself poses risks; improper handling of the pressure washer can lead to injury. Always follow the manufacturer’s instructions for safe operation and maintenance. Tripping hazards can also exist from cords, hoses, and wet surfaces. Keep the work area organized and clean to minimize this risk.
Choosing the Right Equipment and Cleaning Solutions
Getting the right tools and cleaning solutions is key to a successful vinyl siding cleaning project. The wrong equipment can damage your siding, while the wrong cleaning solution can leave it looking dull or streaky. This section will guide you through selecting the appropriate pressure washer and cleaning agents.
Pressure Washer Types and Selection
Choosing the right pressure washer depends on the size of your house and the level of dirt buildup. Overly powerful washers can damage vinyl siding, while underpowered ones will be inefficient. The following table compares different types:
| Pressure Washer Type | Features | Pros | Cons |
|---|---|---|---|
| Electric Pressure Washer | Generally less powerful than gas models; easier to start and maintain; quieter operation. | Lightweight, easy to use, less expensive, ideal for smaller homes or light cleaning. | Lower pressure output, may struggle with stubborn dirt, limited run time depending on battery or cord length. |
| Gas Pressure Washer | More powerful than electric models; typically have larger tanks; offer greater cleaning power. | Higher pressure output, suitable for larger areas and heavy dirt, longer run time. | Heavier, louder, more expensive, requires regular maintenance (oil changes, etc.), can be more difficult to start. |
| Electric Pressure Washer with a Honda Engine | Combines the ease of use of an electric pressure washer with the power of a gas engine. Often features a quieter operation compared to a typical gas pressure washer. | Good balance of power, ease of use, and quieter operation compared to gas-only models. More powerful than standard electric models. | More expensive than standard electric models, still requires some maintenance. |
Cleaning Solution Selection
The best cleaning solution for vinyl siding is generally a mild detergent mixed with water. Harsh chemicals like bleach can damage the siding’s color and finish over time. Avoid abrasive cleaners as well.
Pressure Washer and Cleaning Solution Preparation
Before you begin, always review the manufacturer’s instructions for your pressure washer and cleaning solution. Here’s a step-by-step guide:
- Assemble the pressure washer: Carefully follow the manufacturer’s instructions. Ensure all connections are secure and that the unit is properly grounded (if applicable).
- Fill the detergent tank (if applicable): Use a mild detergent specifically designed for vinyl siding. Never exceed the recommended concentration. A typical mixture might be 1 ounce of detergent per gallon of water, but always check the detergent’s instructions.
- Connect the wand and nozzle: Choose a nozzle appropriate for vinyl siding. A wide-angle nozzle (25-40 degrees) is generally recommended to prevent damage. Avoid using a pencil jet or other high-pressure nozzles.
- Test the pressure washer: Spray the pressure washer in a test area away from your house to ensure the pressure and detergent mixture are correct. Adjust accordingly.
- Safety Check: Double-check all connections and ensure you are wearing appropriate safety gear, including eye protection and gloves.
Always remember to start with a low pressure setting and gradually increase it as needed. It’s better to start low and work your way up than to risk damaging your siding.
Effective Pressure Washing Techniques for Vinyl Siding: Pressure Washing Vinyl Siding

Source: pressurewashr.com
Pressure washing vinyl siding can dramatically improve its appearance, but improper techniques can cause damage. This section details the best practices for achieving a clean, damage-free result. Remember, a gentle touch and the right tools are key to success.
Nozzle Selection and Usage
Choosing the right nozzle is crucial for effective and safe cleaning. Different nozzles are designed for various tasks and siding features. Using the wrong nozzle can lead to damage, such as gouging or warping the siding.
- 25-degree nozzle: This is the workhorse nozzle for most vinyl siding cleaning. Its wide spray pattern effectively cleans large areas without excessive pressure in one pass.
- 40-degree nozzle: Offers a wider spray pattern than the 25-degree nozzle, ideal for pre-rinsing and rinsing off cleaning solutions. It’s gentler and reduces the risk of damage.
- Fan-tip nozzle (variable pressure): Allows for adjusting the spray width and pressure. Useful for delicate areas like corners and seams, enabling more precise cleaning.
- Pencil jet nozzle (low-pressure): Best suited for spot cleaning stubborn stains. Use with extreme caution on vinyl siding due to its concentrated pressure.
Maintaining Consistent Distance from the Siding
Maintaining a consistent distance between the nozzle and the siding is paramount to prevent damage. The pressure of the water stream decreases with distance.
Too close, and you risk gouging or warping the siding due to concentrated pressure. Imagine the effect of a high-pressure stream directly impacting a small area – it’s like a tiny sandblaster. Too far, and the cleaning power is significantly reduced, requiring more time and effort. Generally, a distance of 12-18 inches is recommended, but this may vary depending on the nozzle and pressure setting. Observe the cleaning effect and adjust the distance accordingly; a gentle, consistent rinsing is the goal.
Cleaning Different Types of Dirt and Grime
Various stains require different cleaning approaches. Aggressive methods might be necessary for stubborn stains like mildew or algae, while gentler techniques suffice for dirt and grime.
| Type of Stain | Cleaning Method | Notes |
|---|---|---|
| Dirt and Grime | Low-pressure wash with a 40-degree nozzle. Pre-soak with water to loosen debris. | For light dirt, a simple rinse may be sufficient. |
| Mildew and Algae | Apply a mildew/algae remover according to the manufacturer’s instructions. Allow sufficient dwell time. Rinse thoroughly with a 40-degree nozzle. | Always test the cleaner in an inconspicuous area first. Wear protective gear. |
| Stubborn Stains | Consider using a soft brush along with a low-pressure wash to gently scrub away stubborn stains. | Avoid harsh scrubbing which could scratch the siding. |
Post-Cleaning Care and Maintenance of Vinyl Siding
Source: techicy.com
After the satisfying blast of your pressure washer has banished the grime, the job isn’t quite finished. Proper post-cleaning care is crucial to protect your investment and ensure your siding looks its best for years to come. Neglecting this step can lead to streaking, water damage, or even premature fading.
Thorough Rinsing of Vinyl Siding
Completely rinsing away all traces of cleaning solution is paramount. Residual cleaner can leave unsightly marks, attract more dirt, and potentially damage the vinyl over time. Use a garden hose with a nozzle that provides a gentle, wide spray. Systematically work your way across the entire surface of the siding, paying particular attention to crevices and corners where cleaning solution might accumulate. For taller houses, a long reach nozzle or a pressure washer with a wand extension can be helpful. A final, light rinse with clean water will ensure complete removal of any lingering soap.
Inspecting Vinyl Siding for Damage, Pressure washing vinyl siding
A thorough inspection after cleaning allows you to identify any potential problems caused by the pressure washing process or pre-existing damage. This is your chance to catch minor issues before they escalate into larger, more costly repairs.
- Check for scratches: Look closely for any scratches or abrasions on the siding’s surface. These might appear as fine lines or deeper gouges, often caused by improper pressure washing technique or pre-existing damage.
- Examine for cracks or gaps: Inspect for cracks in the vinyl itself or gaps between siding panels. These could indicate underlying structural issues or damage from harsh weather conditions.
- Assess for discoloration: Check for any areas of discoloration or fading, particularly in areas where the cleaning solution might have lingered. This can be a sign of chemical damage or pre-existing sun damage.
- Look for loose or damaged caulking: Examine the caulking around windows, doors, and other openings for cracks, gaps, or deterioration. This is crucial for preventing water intrusion.
Repair methods will vary depending on the type and severity of the damage. Minor scratches might require only touch-up paint, while larger cracks or gaps might necessitate replacing damaged sections of siding. Loose caulking should be removed and replaced with fresh, high-quality caulking designed for exterior use.
Recommended Maintenance Procedures
Regular maintenance is key to keeping your vinyl siding looking its best and extending its lifespan. A little preventative care goes a long way.
- Regular cleaning: While a full pressure wash might only be needed every few years, regular cleaning with a garden hose and a soft brush can prevent dirt and debris from building up. This is especially important in areas prone to pollen, dust, or other environmental contaminants.
- Inspect regularly: Conduct visual inspections of your siding at least twice a year – once in spring and once in fall – to check for any signs of damage or deterioration. Early detection allows for timely repairs and prevents small problems from becoming major ones.
- Trim overhanging branches: Overhanging tree branches can scratch your siding and trap moisture, leading to mold and mildew growth. Regularly trim back any branches that are close to your home.
- Clean gutters and downspouts: Clogged gutters and downspouts can cause water to overflow and damage your siding. Keep them clean to ensure proper water drainage away from your home.
Illustrative Examples of Pressure Washing Vinyl Siding
Pressure washing vinyl siding can dramatically improve its appearance, but improper techniques can cause damage. Let’s look at some examples to illustrate best practices and potential pitfalls. Understanding these examples will help you achieve professional-looking results while protecting your investment.
Pressure Washing a Section of Vinyl Siding: A Step-by-Step Example
This example focuses on cleaning a 10ft x 8ft section of moderately soiled light beige vinyl siding.
First, thoroughly inspect the area for loose or damaged siding, paying special attention to caulking around windows and doors. Repair any issues before proceeding.
Next, prepare the area by clearing away any debris, such as leaves, twigs, or loose paint chips. This prevents these items from being forced into the siding during the cleaning process or damaging your pressure washer.
Using a low-pressure setting (around 1500 PSI) and a 25-degree nozzle, begin at the bottom of the section and work your way up in overlapping vertical strokes. Keep the nozzle about 12-18 inches from the siding to avoid damaging it.
For this example, a mild detergent specifically formulated for vinyl siding was diluted according to the manufacturer’s instructions and applied using a garden sprayer before pressure washing. This pre-soaking allows the detergent to break down the dirt and grime, making the cleaning process more efficient.
After washing, rinse the area thoroughly with clean water, ensuring all traces of detergent are removed. This is crucial to prevent streaking or discoloration.
Finally, inspect the cleaned area. The siding should be clean, free of dirt and grime, and its original color should be restored. The texture should feel smooth, not rough or damaged.
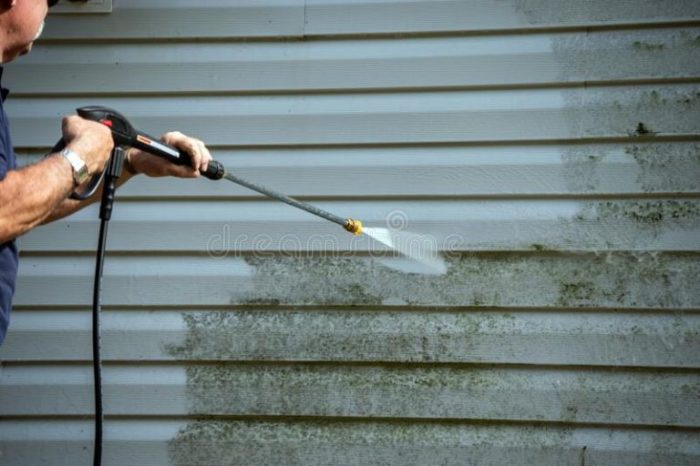
Visual Differences Between Properly and Improperly Cleaned Vinyl Siding
Properly cleaned vinyl siding will exhibit a uniform color, free from streaks or discoloration. The surface will be smooth to the touch, and the original texture will be visible. The overall appearance will be fresh and clean, enhancing the curb appeal of the house.
In contrast, improperly cleaned siding might show uneven color, with areas appearing lighter or darker than others. The surface may be rough in places, possibly due to excessive pressure or abrasive cleaning solutions. Streaks or discoloration from detergent residue can be evident. In severe cases, the siding might show signs of warping or damage.
Impact of Incorrect Pressure or Cleaning Solutions
Using excessive pressure (over 2000 PSI on most vinyl sidings) can damage the vinyl siding, leading to warping, cracking, or even puncturing. Imagine the impact of a high-powered jet of water directly impacting a relatively thin and flexible material. This direct force can cause physical damage to the material. The resulting damage might not be immediately apparent but could weaken the siding, leading to premature failure.
Using harsh chemicals or inappropriate cleaning solutions can also cause discoloration or dulling of the vinyl siding. Strong acids or alkalis can chemically react with the vinyl, altering its color and potentially damaging its surface. For instance, using bleach can cause the siding to become brittle and yellow over time. Always use cleaning solutions specifically designed for vinyl siding, and follow the manufacturer’s instructions carefully.
Last Point

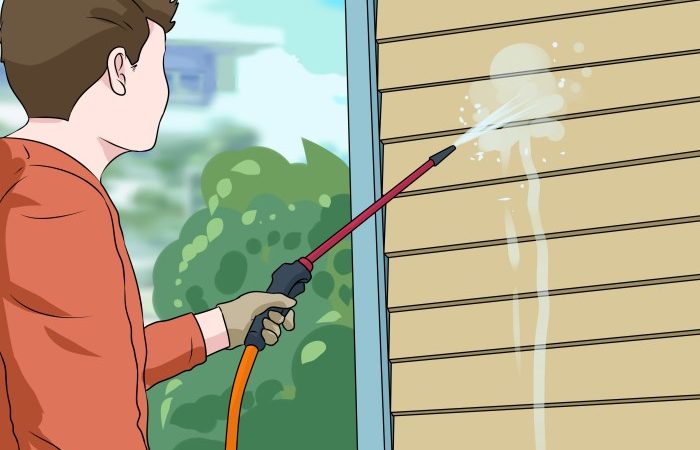
Source: wikihow.com
Pressure washing your vinyl siding can dramatically improve your home’s appearance, but only if done correctly. Remember, safety first! By following the guidelines in this guide, from selecting the appropriate equipment and solutions to mastering proper techniques and post-cleaning care, you can achieve a stunning clean without causing damage. A little preparation and the right approach will make all the difference, leaving your vinyl siding looking pristine for years to come. So grab your gear and let’s get cleaning!
Comments are closed.