How to Replace Vinyl Siding A Step-by-Step Guide
How to replace vinyl siding? It might sound daunting, but with the right plan and a little elbow grease, you can transform your home’s exterior. This guide walks you through every step, from assessing the existing siding and planning your budget to installing new panels and finishing touches. We’ll cover everything from identifying potential problems to ensuring a professional-looking finish, making this a DIY project you can tackle with confidence.
Replacing vinyl siding is a fantastic way to boost your home’s curb appeal and protect it from the elements. Whether you’re dealing with storm damage, outdated aesthetics, or simply want a fresh look, this comprehensive guide will equip you with the knowledge and practical steps to complete this project. We’ll cover choosing the right materials, handling waste responsibly, and mastering the installation techniques to achieve a flawless result.
Assessing the Current Siding
Before you even think about grabbing your tools, you need to thoroughly inspect your existing vinyl siding. This isn’t just about aesthetics; a proper assessment is crucial for planning your replacement project effectively and avoiding costly mistakes down the line. A careful evaluation will reveal the extent of the work needed and help you determine the best approach for removal and installation.
Proper assessment involves a visual inspection of the entire house, paying close attention to detail. You’ll be looking for signs of damage and identifying any underlying issues that might complicate the replacement process. This detailed examination will save you time, money, and potential headaches later on.
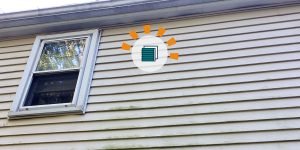
Identifying Damaged Siding
Start by systematically inspecting each panel of siding, looking for signs of damage. This includes checking for cracks, particularly around fasteners or seams. Look for any signs of warping or buckling, indicating possible water damage or improper installation. Loose panels that are easily pulled away from the wall are a clear sign of failure and need immediate attention. Pay particular attention to areas prone to moisture damage, such as corners, around windows and doors, and low-lying sections of the house. Rotting wood behind the siding is a serious problem and requires attention before new siding is installed. You might need a pry bar to carefully check for loose or damaged areas behind the panels. If you find rot, you’ll need to replace the affected wood before installing new siding.
Vinyl Siding Condition Checklist
Before beginning any work, creating a checklist is helpful to document the condition of your existing siding. This checklist can be used to track the extent of damage and guide your purchasing decisions for the new siding. It also provides a record for future reference.
- Age of Siding: Note the approximate age of the existing siding. Older siding is more likely to have sustained damage and may require more extensive replacement.
- Material Type: Identify the type of vinyl siding (e.g., lap siding, shake siding). Different types have varying installation methods and replacement requirements.
- Cracks and Breaks: Document the number and location of cracks and breaks in the siding panels. Note the severity of the damage (small hairline cracks versus large, gaping holes).
- Loose Panels: Identify any loose or detached panels. Note whether they are easily removed or if they are stuck due to damage or debris.
- Warping and Buckling: Document any warping, buckling, or other signs of distortion in the siding panels. This often indicates underlying water damage.
- Water Damage: Look for evidence of water damage, such as discoloration, staining, or mold growth. This is crucial in determining the extent of the underlying problem.
- Fastener Issues: Inspect the nails or screws holding the siding in place. Look for loose or missing fasteners, which can indicate a problem with the installation or damage to the underlying structure.
- Insect or Animal Damage: Check for evidence of insect or animal damage, such as holes or gnaw marks. This might require additional repairs before siding replacement.
Identifying Underlying Issues
Discovering underlying problems like water damage or faulty installation is vital. Water damage, often hidden behind the siding, can lead to rot in the sheathing or framing of your house. This is much more expensive to repair than just replacing the siding. Faulty installation can cause the new siding to fail prematurely. For example, if the original siding was installed without proper flashing around windows and doors, water can get behind the new siding and cause the same problems. Addressing these underlying issues *before* replacing the siding is essential for a long-lasting, successful project. Consider taking photos to document the findings. These photos will be invaluable for later reference and can help with any insurance claims.
Planning the Replacement Project: How To Replace Vinyl Siding

Replacing your vinyl siding is a significant undertaking, requiring careful planning to ensure a smooth and successful project. This section outlines the key steps involved, from material selection to waste disposal, helping you navigate the process efficiently and effectively. Proper planning minimizes unexpected costs and delays, leading to a more satisfying outcome.
Material Selection and Quantity Calculation
Choosing the right vinyl siding is crucial. Consider factors like color, style, thickness (measured in mils), and the manufacturer’s warranty. Thicker siding generally offers better durability and insulation. Accurate quantity calculation prevents material shortages or excess waste. Measure the total surface area of your house to be sided, adding extra for cuts and potential mistakes. Most manufacturers provide online calculators or guides to help determine the amount of siding, trim, and accessories you’ll need. Remember to factor in extras for unexpected issues, such as damaged panels. For example, if you calculate needing 100 square feet of siding, adding 10-15% extra (110-115 square feet) is a good safety margin.
Tools and Equipment Required
Having the right tools significantly impacts the efficiency and safety of the project. You’ll need basic carpentry tools such as a measuring tape, level, utility knife, hammer, and screwdriver. More specialized tools may include a circular saw (with a fine-tooth blade for vinyl), a nail gun (consider renting one if you don’t own it), and a pry bar for removing old siding. Safety equipment is paramount; this includes safety glasses, work gloves, and a dust mask to protect against airborne particles during removal. Consider using a ladder that is appropriately sized and stable for the job and always follow ladder safety guidelines.
Safety Precautions
Safety should be your top priority throughout the project. Always wear appropriate safety gear, including eye protection, gloves, and a dust mask. Be mindful of power tools; follow manufacturer instructions carefully. When working at heights, use a stable ladder and follow all safety guidelines. Dispose of old siding and debris properly, avoiding injury from sharp edges or nails. Be aware of potential hazards like electrical wires and gas lines, and call your local utility companies before beginning work to have them marked.
Sample Budget for Vinyl Siding Replacement
Creating a realistic budget is essential for managing project costs. The following is a sample budget, and actual costs will vary depending on location, material choices, and labor costs. It’s always advisable to get multiple quotes from contractors.
| Item | Estimated Cost |
|---|---|
| Material Costs (Siding, Trim, Fasteners) | $3,000 – $6,000 |
| Labor Costs (Removal, Installation) | $2,000 – $5000 |
| Permits and Inspections | $100 – $500 |
| Waste Disposal | $100 – $300 |
| Contingency (Unexpected Expenses) | $500 – $1000 |
| Total Estimated Cost | $5,700 – $12,800 |
Note: These are estimates, and actual costs can vary significantly. This budget provides a reasonable range based on typical project sizes and material costs in many regions.
Waste Disposal and Recycling
Responsible waste disposal is crucial. Old vinyl siding can often be recycled. Check with your local waste management facility or recycling center for their guidelines and accepted materials. Some recycling centers accept vinyl siding directly, while others may require it to be sorted and cleaned. Alternatively, you can explore options like repurposing the siding for other projects or selling it to salvage yards. Properly disposing of or recycling old siding helps reduce landfill waste and promotes environmental sustainability. For example, many communities now offer curbside pickup for certain types of recyclable materials, including some plastics. Always check your local regulations before disposing of any construction waste.
Removing Old Vinyl Siding
Removing old vinyl siding can seem daunting, but with the right approach and tools, it’s a manageable DIY project. This section details safe and efficient methods for removing the siding, handling the nails and staples, and properly disposing of the waste. Remember to always prioritize safety and follow local regulations.
The key to successful vinyl siding removal is patience and a methodical approach. Working slowly and carefully will minimize damage to the underlying structure of your home and prevent injury to yourself. Start by assessing the condition of the siding – some panels may be more brittle or damaged than others, requiring extra caution during removal.
Siding Removal Techniques
Several methods exist for removing vinyl siding, each with its advantages and disadvantages. The best method often depends on the age and condition of the siding, as well as the climate and your personal comfort level with various tools.
| Removal Method | Tools Required | Safety Precautions | Waste Disposal |
|---|---|---|---|
| Pry Bar Removal | Pry bar (various sizes), hammer, work gloves, safety glasses | Wear gloves and safety glasses to protect against splinters and flying debris. Use caution when prying to avoid damaging the underlying sheathing. Support the siding panel as you remove it to prevent it from falling and causing injury. | Check with your local waste management facility for proper disposal guidelines. Many areas have specific regulations for vinyl siding disposal, including recycling options. |
| Utility Knife Removal | Utility knife with sharp blade, work gloves, safety glasses | Use extreme caution with the utility knife to avoid cutting yourself or damaging the underlying sheathing. Make small, controlled cuts to separate the siding panels. | Same as pry bar removal. Smaller pieces may be easier to manage for transport. |
| Combination Method | Pry bar, utility knife, hammer, work gloves, safety glasses | Combine the safety precautions listed above. This method is useful when dealing with particularly stubborn or damaged panels. | Same as pry bar removal. |
Nail and Staple Removal, How to replace vinyl siding
Once the siding panels are removed, you’ll need to carefully remove the nails and staples securing them. This is crucial to prepare the wall for the new siding installation. Improper nail removal can lead to damage to the sheathing or house wrap.
For most nails and staples, a hammer and nail puller will suffice. However, if nails are rusted or particularly stubborn, you may need to use a reciprocating saw with a metal-cutting blade. Always wear safety glasses to protect your eyes from flying debris.
Protecting Underlying Structure
Protecting the underlying sheathing and house wrap is vital during siding removal. Avoid using excessive force when prying or cutting. If you encounter resistance, try a different approach or use a smaller tool to carefully work around the area. Any damage to the sheathing or house wrap should be repaired before installing the new siding.
Preparing the Wall Underlayment
Once the old vinyl siding is removed, you’re left with the underlying wall—and this is where careful preparation is key to a long-lasting, beautiful new siding job. Inspecting and properly preparing this area prevents future problems like moisture damage and ensures your new siding performs as expected. Think of this stage as building a solid foundation for your new exterior.
This section covers inspecting the wall sheathing, installing a weather barrier, and addressing any issues before installing the new siding. A well-prepared wall is crucial for the longevity and performance of your new vinyl siding.
Wall Sheathing Inspection and Repair
Before installing any new materials, thoroughly inspect the existing wall sheathing (typically plywood or OSB). Look for any signs of rot, damage, or insect infestation. Soft or spongy areas indicate rot, requiring replacement. Damaged sections should be cut out and replaced with matching material, ensuring proper fastening. If you find evidence of insect activity, treat the affected areas with an appropriate insecticide before proceeding. Remember, solid, sound sheathing is essential for a secure and durable siding installation. For instance, a section of rotted plywood near a window might need a replacement piece that’s at least 12 inches wider on all sides than the damaged area to prevent future issues.
House Wrap Installation: A Critical Moisture Barrier
Installing a house wrap, also known as a weather barrier, is crucial for protecting your home from moisture intrusion. House wrap is a breathable material that allows moisture vapor to escape from the inside while preventing liquid water from entering. This prevents mold and rot, extending the life of your home and your new siding. Start at the bottom of the wall, overlapping each sheet by several inches (following manufacturer’s instructions) and securing it with staples or specialized fasteners. Ensure a tight seal around windows and doors, carefully tucking the wrap into corners and crevices. Think of it as a second skin for your house, providing an extra layer of protection against the elements. Neglecting this step can lead to significant and costly problems down the line.
Wall Preparation: Cleaning, Patching, and Sealing
Once the house wrap is in place, it’s time to prepare the wall for the new siding. Begin by cleaning the surface thoroughly. Remove any loose debris, dirt, or dust using a stiff brush or pressure washer (use low pressure to avoid damaging the house wrap). Next, address any remaining gaps or cracks in the sheathing. Use exterior-grade caulk or sealant to fill these imperfections, creating a smooth, even surface. This prevents air infiltration and improves the overall insulation of your home. For example, gaps around pipes or electrical boxes should be carefully sealed to prevent drafts and water intrusion. Finally, a thorough inspection of your work is crucial to ensure you haven’t missed any spots.
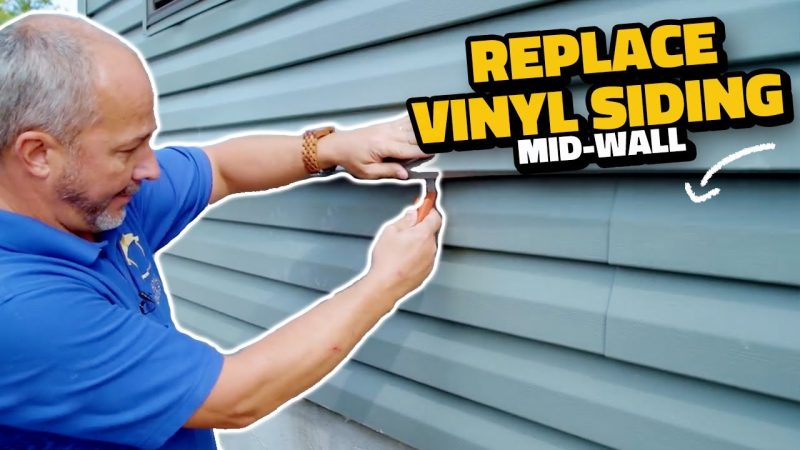
Installing New Vinyl Siding
Installing new vinyl siding is a straightforward process, but attention to detail ensures a professional-looking and long-lasting result. Remember to always consult the manufacturer’s instructions for your specific siding product, as variations in installation techniques may exist. This guide provides general best practices.
Begin installation at the lowest point of your exterior wall, typically the bottom edge. This allows you to work your way up, ensuring proper overlap and a neat finish. You’ll be working with individual siding panels, which interlock to form a continuous weather-resistant barrier.
Starting the First Course
The first row of siding, known as the starter course, is crucial for establishing a level and straight baseline. This course is usually slightly different from the other panels, often featuring a J-channel or a similar piece designed to fit snugly against the foundation or bottom trim. Carefully measure and cut the starter strip to fit the length of the wall, ensuring a tight fit against the bottom edge. Secure it using nails or screws, following the manufacturer’s recommendations for spacing and depth.
Installing Subsequent Panels
Subsequent panels are installed by interlocking them with the previous row. Each panel should overlap the one below by the recommended amount (usually specified by the manufacturer). Maintain consistent alignment and spacing between panels for a clean, uniform look. Before nailing, make sure the panel is correctly aligned and seated. Using a level to check alignment is highly recommended.
Cutting and Fitting Panels Around Obstacles
Windows, doors, and corners require precise cutting and fitting to ensure a seamless appearance. Use a sharp utility knife or a siding cutter to make accurate cuts. For windows and doors, you’ll typically need to measure and cut the panels to fit around the frames, leaving the necessary clearances for opening and closing. For corners, specialized corner trim pieces are generally used. Measure carefully, cut precisely, and ensure proper alignment before securing the panels.
Securing Siding Panels
Proper nailing is essential for a secure and long-lasting installation. Avoid over-driving nails, which can cause damage to the siding. The general rule is to leave a small expansion gap between the nail and the siding panel, to accommodate expansion and contraction due to temperature changes. This gap allows the siding to move without buckling or warping. Typically, nails should be placed near the center of the nail holes provided in the siding panels, driving them in until they are flush or slightly below the surface of the siding. This is often accomplished using a nail gun that allows for the control of nail depth.
Finishing Touches
Once all the siding panels are installed, inspect the entire installation for any gaps or misalignments. Make any necessary adjustments and repairs before proceeding. Remember to install any finishing trim pieces, such as J-channel, corner trim, and drip edge, to complete the installation and protect the wall from water damage. Always refer to the manufacturer’s instructions for your specific siding product to ensure proper installation and warranty compliance.
Finishing Touches and Inspection
After installing the new vinyl siding, the final steps involve adding finishing touches and meticulously inspecting the entire installation to ensure a professional and long-lasting result. This includes installing trim pieces and accessories, and then carefully checking for any flaws or imperfections. Taking the time for a thorough inspection now will prevent future problems.
Properly installed trim and accessories not only enhance the aesthetic appeal of your new siding but also provide crucial protection against the elements. These pieces create a clean, finished look and prevent water damage by sealing gaps and covering exposed edges. Careful attention to detail during this phase is crucial for the longevity and performance of the entire siding system.
Installing Trim and Accessories
Installing trim and accessories requires precision and attention to detail. J-channels are used to neatly finish the edges of the siding, providing a clean transition between the siding and other building features. Corner pieces provide a seamless, weathertight connection at outside corners, preventing water intrusion. Starter strips create a level base for the first row of siding, ensuring a straight and even installation. Each piece needs to be carefully measured and cut to fit snugly, ensuring a watertight seal. Using the correct fasteners is also important; using too many can damage the siding, while too few may compromise the structural integrity of the installation. For example, a common mistake is using nails that are too long, which can puncture the siding behind the installed piece.
Inspecting the Finished Installation
A thorough inspection is crucial to identify and rectify any imperfections before they become significant problems. Start by visually inspecting the entire surface of the siding, looking for gaps, misalignments, or damage to the siding panels. Pay close attention to corners, seams, and around windows and doors, as these areas are more prone to issues. Check for any loose or improperly fastened pieces. A consistent gap between the siding and the house should be maintained to allow for thermal expansion and contraction. An inconsistent gap may indicate an underlying issue with the wall framing or the installation process. For example, a significant gap near a corner could indicate improper installation of a corner piece.
Final Inspection Checklist
A systematic checklist ensures a comprehensive inspection. Going through each item systematically will minimize the chances of overlooking crucial details.
- Visual Inspection: Check for any gaps, misalignments, damage, or loose pieces across the entire surface.
- Seam Inspection: Carefully examine all seams and joints for proper alignment and sealing.
- Corner Inspection: Verify the proper installation and sealing of corner pieces.
- Trim and Accessory Inspection: Check all J-channels, starter strips, and other accessories for proper installation and secure fastening.
- Fastener Inspection: Ensure all fasteners are properly driven and not protruding excessively.
- Water Penetration Check: Inspect for any potential points of water entry.
- Overall Appearance: Evaluate the overall aesthetic appeal and consistency of the installation.
Last Word

Source: githubassets.com
Replacing vinyl siding successfully hinges on careful planning, meticulous execution, and attention to detail. From initial assessment and material selection to the final inspection, each step plays a crucial role in achieving a durable and aesthetically pleasing outcome. Remember to prioritize safety, utilize the appropriate tools, and don’t hesitate to seek professional assistance if needed. With a methodical approach and the knowledge gained from this guide, you’ll be well on your way to a stunningly renewed home exterior.
Comments are closed.