Clean Mold Off Siding A Homeowners Guide

Clean mold off siding: It sounds like a chore, but tackling mold on your home’s exterior is crucial for curb appeal and protecting your home’s structure. This guide walks you through identifying different types of mold, choosing the right cleaning methods for your siding material (wood, vinyl, aluminum – we cover them all!), and understanding the safety precautions you need to take. We’ll even help you prevent future mold growth, saving you time and money in the long run.
From understanding the conditions that encourage mold growth (think moisture and shade) to mastering pressure washers and choosing the right cleaning solutions, we’ll equip you with the knowledge and confidence to handle this common homeowner problem. We’ll also cover when calling a professional, which is the best course of action.
Identifying Mold on Siding
Source: redd.it
Mold growth on your siding can significantly impact your home’s curb appeal and, more importantly, your family’s health. Early detection is key to preventing further damage and potential health risks. Understanding how to identify mold is the first step in effective remediation.
Visual Characteristics of Mold on Different Siding Materials
Mold’s appearance varies depending on the type of mold, the siding material it’s growing on, and the environmental conditions. On wood siding, mold often appears as discolored patches, ranging from black and green to brown and gray. The texture can be fuzzy, slimy, or even powdery, depending on the species. Vinyl siding, being less porous than wood, may show mold as dark streaks or spots, often along seams or areas where moisture collects. Aluminum siding, while less susceptible, can still show mold growth, usually appearing as discoloration that’s harder to spot than on wood or vinyl. The mold may adhere to the surface or penetrate slightly into the paint or sealant.
Mold Colors and Textures
Mold comes in a wide array of colors and textures. Common colors include black, green, gray, brown, white, and even orange or pink. The texture can range from velvety or fuzzy to slimy or powdery. For example, *Cladosporium*, a common outdoor mold, often presents as a dark green or olive-green, velvety growth. Other molds might appear as distinct black spots or streaks. The texture is a crucial factor in identification; a slimy texture often indicates a wetter environment and potentially a more aggressive mold species.
Conditions Promoting Mold Growth on Siding, Clean mold off siding
Several factors contribute to mold growth on siding. Persistent moisture is the primary driver. This can come from leaks, overflowing gutters, poor drainage, or even high humidity. Shaded areas, which stay damp longer, are particularly vulnerable. Areas with limited air circulation also promote mold growth as it inhibits the drying process. Finally, the material itself plays a role; porous materials like wood are more susceptible than non-porous materials like aluminum.
Common Mold Types Found on House Siding
| Mold Type | Color | Texture | Common Locations |
|---|---|---|---|
| Cladosporium | Dark green, olive green, brown | Velvety | Shaded areas, north-facing walls |
| Alternaria | Black, brown, olive green | Fuzzy, powdery | Damp areas, near gutters |
| Aspergillus | Green, black, yellow, brown | Powdery | Areas with poor ventilation |
| Penicillium | Green, blue-green, white | Fuzzy, powdery | Damp wood, around windows and doors |
Safety Precautions for Mold Removal
Mold removal, while seemingly straightforward, presents potential health risks if not approached carefully. Taking the necessary safety precautions is crucial to protect yourself and your family from exposure to harmful mold spores and mycotoxins. This section Artikels essential safety measures for a safe and effective mold remediation process.
Personal Protective Equipment (PPE)
Protecting yourself from mold exposure requires the use of appropriate personal protective equipment (PPE). This is non-negotiable, even for seemingly small mold infestations. Inadequate protection can lead to serious respiratory problems and other health issues. The minimum recommended PPE includes a N95 respirator (or higher) to filter out mold spores, protective eyewear to shield your eyes from airborne particles and splashes of cleaning solutions, impermeable gloves (nitrile or similar) to prevent skin contact, and long-sleeved clothing to cover exposed skin. Consider adding a protective suit if dealing with extensive mold growth.
Ventilation During Mold Removal
Proper ventilation is paramount during mold removal to dilute the concentration of mold spores in the air. Before starting, open all windows and doors to create cross-ventilation. If possible, use fans to further enhance airflow, directing them outwards to expel contaminated air. Consider using a HEPA-filtered air purifier to remove remaining spores from the air after cleaning. In cases of extensive mold growth, professional mold remediation services should be engaged, as they possess specialized equipment for containing and safely removing mold spores.
Health Risks Associated with Mold Exposure and Mitigation
Mold exposure can trigger a variety of health problems, ranging from allergic reactions (like sneezing, coughing, and itchy eyes) to more severe respiratory issues such as asthma exacerbations and hypersensitivity pneumonitis. Individuals with pre-existing respiratory conditions are particularly vulnerable. Mycotoxins, toxic substances produced by some molds, can also cause adverse health effects. Mitigating these risks involves thorough cleaning with appropriate PPE, proper ventilation, and minimizing exposure time. If you experience any respiratory symptoms or allergic reactions after mold removal, consult a healthcare professional immediately.
Safety Checklist for Mold Removal
A comprehensive checklist ensures a safe and effective mold removal process.
- Before Cleaning: Assess the extent of mold growth, gather necessary PPE, ensure adequate ventilation, and inform household members of the cleaning process.
- During Cleaning: Wear all recommended PPE, maintain proper ventilation, avoid disturbing the mold unnecessarily (to minimize spore dispersal), use appropriate cleaning solutions (following product instructions carefully), and regularly check the condition of your PPE.
- After Cleaning: Dispose of contaminated materials properly (following local regulations), thoroughly clean all used PPE, and monitor your health for any adverse reactions. Consider using a HEPA vacuum to remove residual mold spores.
Cleaning Methods for Different Siding Types

Source: gatorclean.net
Cleaning mold from your siding depends heavily on the material. Different materials react differently to cleaning solutions and pressure, so choosing the right method is crucial to avoid damage. Using the wrong technique can lead to discoloration, warping, or even further damage to your siding. Let’s explore the best approaches for common siding types.
Wood, vinyl, and aluminum siding each require a tailored approach to mold removal. While a simple cleaning solution might suffice for some, others necessitate more careful techniques to prevent damage. The type of mold present and the severity of the infestation also play a role in determining the best cleaning method.
Cleaning Solutions for Different Siding Materials
Choosing the right cleaning solution is just as important as the cleaning method itself. Using too harsh a cleaner can damage your siding, while a weak solution may not effectively remove the mold. Here’s a breakdown of suitable solutions for various siding materials:
For wood siding, a gentle solution of mild detergent and water is often sufficient. Avoid using bleach, as it can damage the wood and cause discoloration. For more stubborn mold, a solution of trisodium phosphate (TSP) can be effective, but always follow the manufacturer’s instructions carefully and rinse thoroughly. Remember to test any solution in an inconspicuous area first to check for adverse reactions.
Vinyl siding is generally more durable and can tolerate stronger cleaning solutions. A solution of bleach and water (typically a 1:10 ratio of bleach to water) is often effective. However, avoid using excessive bleach, as it can degrade the vinyl over time. Mold killers specifically designed for vinyl siding are also available and can be a safer alternative to bleach.
Aluminum siding is the most durable and can withstand more aggressive cleaning methods. A pressure washer with a low-pressure nozzle can be effective, but always maintain a safe distance to avoid damaging the surface. A solution of mild detergent and water is usually sufficient, but for persistent mold, a stronger solution of bleach and water may be used, again, always testing in an inconspicuous area first.
Pressure Washing Vinyl Siding
Pressure washing is an effective method for removing mold from vinyl siding, but it requires a careful approach to avoid damage. Here’s a step-by-step guide:
- Prepare the area: Clear the area around the siding of any obstacles, such as plants, furniture, or debris. Protect nearby landscaping with tarps or plastic sheeting.
- Mix the cleaning solution: Prepare a solution of bleach and water (a 1:10 ratio is generally recommended). Always add bleach to water, never the other way around, to prevent splashing.
- Apply the solution: Using a garden sprayer or a pump-up sprayer, apply the cleaning solution evenly to the affected areas of the siding. Allow the solution to dwell for 10-15 minutes to allow it to work on the mold.
- Pressure wash: Using a pressure washer with a low-pressure nozzle (1500-2500 PSI is generally recommended), rinse the siding thoroughly. Maintain a safe distance (at least 12-18 inches) from the surface to avoid damaging the vinyl. Work from the bottom up to prevent streaks.
- Rinse again: After pressure washing, rinse the siding again with clean water to remove any remaining cleaning solution. This step is crucial to prevent any damage to the vinyl siding.
Preventing Mold Regrowth
After cleaning, preventing mold regrowth is key. Regularly inspect your siding for any signs of mold or mildew. Proper ventilation is crucial; ensure gutters and downspouts are clear to prevent water from accumulating against the siding. Trimming overhanging branches helps improve air circulation and prevents moisture buildup. Consider using a mold-resistant sealant on wood siding to further protect it from moisture. Regularly cleaning your siding, at least once or twice a year, can prevent mold from taking hold in the first place. Promptly addressing any leaks or water damage is also vital to prevent mold growth.
Tools and Equipment for Mold Removal
Tackling mold on your siding effectively requires the right tools. Having the proper equipment not only speeds up the process but also ensures a thorough and safe cleaning job, preventing further mold growth and potential health issues. This section Artikels the essential tools and their proper usage.
Essential Tools and Equipment
Before you begin, gather the necessary tools. Improper tools can lead to ineffective cleaning or even damage to your siding. A well-stocked arsenal ensures a smoother and more efficient mold removal process.
- Pressure Washer: A crucial tool for removing mold, especially from large areas. Choose a pressure washer with adjustable pressure settings.
- Cleaning Brushes/Scrubbers: Different brushes are needed depending on your siding material. Stiff-bristled brushes are suitable for tougher surfaces, while softer brushes are better for delicate materials.
- Garden Hose with Spray Nozzle: Useful for rinsing away cleaning solutions and loosened mold.
- Safety Gear: This includes gloves, eye protection, and a respirator to protect yourself from mold spores and cleaning solutions.
- Buckets: For mixing cleaning solutions and rinsing brushes.
- Measuring Cups and Spoons: For accurate mixing of cleaning solutions.
- Ladder (if necessary): For reaching higher areas of siding.
- Drop Cloths or Tarps: To protect landscaping and walkways from cleaning solutions.
Pressure Washer Usage for Mold Removal
A pressure washer is highly effective for removing mold from siding, but improper use can damage the siding. Always test a small, inconspicuous area first to ensure the pressure and cleaning solution don’t damage the surface.
For most siding types, a pressure setting between 1500 and 2500 PSI is usually sufficient. Using a higher pressure can damage the siding, leading to costly repairs. A 15-degree nozzle is generally recommended for effective mold removal while minimizing damage. A wider nozzle can be used for rinsing. Always maintain a consistent distance from the surface (approximately 12-18 inches) and move the nozzle steadily to avoid concentrated pressure in one spot. Never point the pressure washer at yourself or others.
Cleaning Brushes and Scrubbers
The type of brush or scrubber you use depends heavily on your siding material. For example, using a stiff-bristled brush on vinyl siding can scratch the surface, while a softer brush might be ineffective on tougher materials like wood.
- Stiff-bristled brushes: Ideal for removing stubborn mold from rough or textured surfaces like brick or stone siding.
- Soft-bristled brushes: Best suited for delicate siding materials like vinyl or aluminum, preventing scratches and damage.
- Scrubbing pads: Offer a balance between scrubbing power and surface protection, suitable for various siding types.
Readily Available Cleaning Solutions
Several readily available cleaning solutions are effective for mold removal, but always test a small, inconspicuous area first to check for any discoloration or damage. Remember to follow the manufacturer’s instructions carefully.
- Bleach Solution (Diluted): Mix one part bleach with three parts water. This is a powerful solution, but use caution as it can bleach the color from your siding if left on too long.
- TSP (Trisodium Phosphate): A strong cleaner effective against mold and mildew. Follow the manufacturer’s instructions carefully as it can be harsh on certain materials.
- Commercial Mold Cleaners: Many commercially available mold cleaners are specifically formulated for exterior surfaces and are often safer and more effective than homemade solutions.
- Baking Soda Paste: A gentler option, mix baking soda with water to create a paste. This is suitable for less severe mold infestations.
Preventing Future Mold Growth: Clean Mold Off Siding
Preventing mold growth on your siding isn’t just about cleaning it up after the fact; it’s about creating an environment where mold struggles to thrive. By addressing the underlying causes of moisture buildup, you can significantly reduce the chances of future mold infestations and save yourself the hassle of repeated cleaning.
Mold thrives in damp, shady environments. Understanding the factors that contribute to these conditions is crucial for effective prevention. This includes addressing issues like poor drainage, inadequate ventilation, and landscaping choices that promote moisture retention.
Factors Contributing to Mold Growth and Preventative Measures
Several factors contribute to mold growth on siding. These include excessive moisture from rain, leaks, or condensation; poor air circulation, allowing moisture to linger; and shaded areas that stay damp for extended periods. Addressing these issues is key to preventing future mold problems. For example, regularly inspecting your siding for cracks or damage, promptly repairing any leaks in your roof or gutters, and ensuring proper ventilation around your home can drastically reduce moisture accumulation. Using a high-quality, water-resistant paint or sealant on your siding can also provide an extra layer of protection against moisture penetration.
Proper Gutter Maintenance and Drainage Systems
Properly functioning gutters and downspouts are essential for diverting rainwater away from your home’s foundation and siding. Clogged gutters can lead to water overflow, causing moisture to pool against your siding and creating the ideal breeding ground for mold. Regular gutter cleaning, at least twice a year, is crucial. This involves removing leaves, debris, and other obstructions to ensure smooth water flow. Additionally, ensure downspouts extend far enough away from the house (at least 5 feet) to prevent water from splashing back onto the siding. Consider installing gutter guards to minimize the frequency of cleaning.
Improving Air Circulation Around the House
Good air circulation helps to dry out damp areas and prevent moisture buildup, discouraging mold growth. Proper ventilation can be achieved in several ways. Ensure that your attic and crawl spaces have adequate ventilation to prevent moisture from accumulating. This often involves installing vents or improving existing ventilation systems. Regularly inspect and clean vents to ensure they are not blocked. Consider planting trees and shrubs strategically to allow for sufficient airflow around your home, avoiding dense plantings close to the walls.
Landscaping Techniques to Prevent Mold Growth
Landscaping can significantly impact the moisture levels around your home. Avoid planting dense vegetation directly against your house, as this can trap moisture and shade the siding, creating a damp environment. Instead, maintain a clear space between your house and any plantings to allow for proper air circulation and sunlight exposure. Grade your landscaping to ensure that water drains away from your foundation, preventing water from accumulating near the siding. Consider using drought-tolerant plants that require less watering, thus reducing the overall moisture level around your home. Properly directing drainage away from your house is crucial, preventing water from pooling against the siding.
When to Call a Professional
Tackling mold on your siding can be a DIY project, but knowing when to call in the pros is crucial. Ignoring significant mold infestations can lead to costly repairs and serious health problems. This section will help you determine when professional help is necessary to ensure your safety and the long-term health of your home.
Professional mold remediation is essential when dealing with larger areas of mold growth, particularly if it’s spreading rapidly or exhibiting signs of significant penetration into your home’s structure. Attempting extensive mold removal yourself can expose you to harmful spores and potentially worsen the problem, requiring even more expensive remediation later.
Scenarios Requiring Professional Mold Remediation
Extensive mold growth, especially if it covers more than 10 square feet, is a clear indication to seek professional help. This is because larger infestations often indicate underlying moisture problems that need to be addressed by experts. For instance, a persistent leak behind siding, undetected until significant mold growth is visible, requires professional diagnosis and repair. Similarly, mold spreading quickly despite your cleaning efforts suggests a deeper, more pervasive issue. Another example is mold growth that appears in multiple locations on the siding or extends beyond the siding itself, indicating a broader moisture problem within the wall cavity.
Signs of Extensive or Hidden Mold Damage
Mold isn’t always visible on the surface. Signs of hidden mold damage include persistent musty odors, even after cleaning, discoloration or water stains on interior walls near the affected siding, and unexplained dampness or softness in wall areas. Bulging or cracking paint near the siding can also indicate hidden water damage and potential mold growth behind the wall. A professional mold inspector can use specialized tools, like moisture meters and thermal cameras, to detect hidden mold and moisture problems. For example, a moisture meter can pinpoint areas of excessive moisture within the wall, even if the mold itself is not directly visible. This information helps professionals target remediation efforts effectively.
Risks of DIY Mold Removal for Extensive Infestations
Attempting to remove extensive mold yourself carries significant risks. Mold spores are microscopic and easily become airborne, potentially leading to respiratory problems, allergies, or even more severe health issues. Improper removal techniques can also spread the mold to other areas of your home, worsening the infestation. Additionally, you might not effectively address the underlying moisture problem causing the mold, leading to recurring infestations. For example, if a leak is causing the mold, simply cleaning the mold without fixing the leak will lead to the mold returning. Professionals possess the expertise and equipment to safely contain and remove mold while addressing the root cause.
Decision Tree for Determining When to Call a Professional
This decision tree helps you decide if you should call a professional:
- Is the affected area less than 10 square feet? Yes: Attempt DIY cleaning. No: Proceed to the next question.
- Is the mold spreading rapidly despite cleaning attempts? Yes: Call a professional. No: Proceed to the next question.
- Are there signs of hidden mold damage (musty odors, water stains, soft walls)? Yes: Call a professional. No: Proceed to the next question.
- Are you uncomfortable handling the mold yourself due to health concerns or lack of experience? Yes: Call a professional. No: Attempt DIY cleaning, but monitor closely for any signs of worsening.
Illustrative Examples of Mold Removal

Source: 30aprowash.com
Understanding how mold appears on different siding materials and the cleaning process is crucial for effective remediation. Visualizing the before-and-after states helps homeowners assess the success of their cleaning efforts and identify when professional help is needed. The following examples detail the process and results.
Mold Appearance on Various Siding Materials
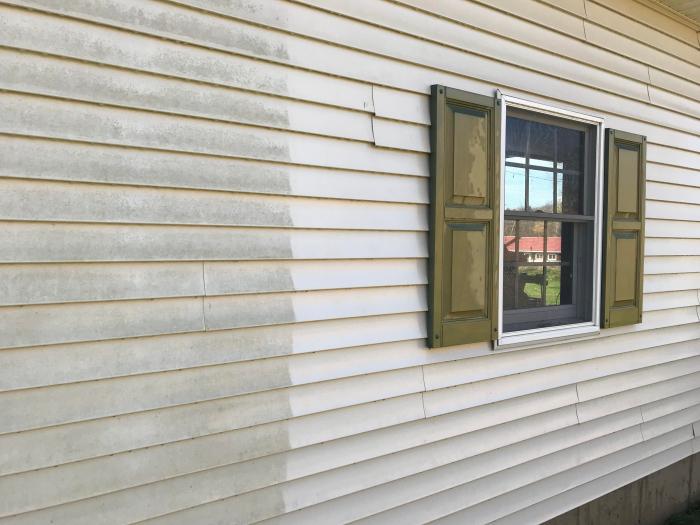
Mold growth on siding varies depending on the material and the extent of the infestation. On vinyl siding, mold often presents as black, gray, or green discoloration, appearing as blotches or streaks. The texture is typically smooth, following the surface of the siding. Before cleaning, these blotches might be fuzzy or slightly raised. After successful cleaning, the vinyl should return to its original, smooth, even color. Improper cleaning might leave streaks or a dull, uneven appearance. On wood siding, mold can penetrate deeper, causing discoloration and a rough, textured surface. The colors can be similar to vinyl siding, but the texture might be more spongy or even cracked in severe cases. Before cleaning, the wood might feel damp and soft in affected areas. After successful cleaning, the wood should regain its original color and texture, though minor discoloration might remain depending on the severity of the infestation. Improper cleaning might leave the wood looking bleached or damaged. On brick siding, mold usually appears as dark stains, often in patches or streaks. The texture is generally less pronounced than on wood or vinyl, as it typically sits on the surface of the brick. Before cleaning, these stains can be quite dark and difficult to remove completely. After successful cleaning, the brick should be noticeably cleaner, although some staining may persist. Improper cleaning could lead to damage to the brick’s mortar.
Cleaning Mold from Wood Siding
Let’s consider a section of weathered cedar wood siding approximately 4 feet wide and 8 feet high, heavily colonized with black mold. The mold appears as dark, fuzzy patches concentrated in the lower section, where moisture accumulates. The affected wood feels slightly soft to the touch. The cleaning process begins with preparation: protective eyewear, gloves, and a respirator are donned. The area is thoroughly wetted down with a solution of water and a suitable mold-killing detergent, ensuring complete saturation of the moldy areas. A stiff-bristled brush is then used to gently scrub the affected areas, working from top to bottom to avoid re-contamination. After scrubbing, the area is rinsed thoroughly with clean water, ensuring all traces of detergent and mold are removed. The siding is allowed to air dry completely. After drying, the cleaned section appears significantly lighter, with the black mold mostly removed. The wood’s natural texture is still visible, though possibly slightly lighter than the surrounding unaffected areas. Improper cleaning, such as using harsh chemicals or excessive scrubbing, might result in damage to the wood, leaving it bleached or roughened. Conversely, insufficient cleaning would leave residual mold, leading to potential re-growth.
Last Word
Cleaning mold from your siding might seem daunting, but with the right information and approach, it’s a manageable task. Remember to prioritize safety, choose the appropriate cleaning method for your siding type, and always consider professional help for extensive mold issues. By following the steps outlined in this guide, you can restore your home’s exterior to its former glory and prevent future mold growth. A clean home is a happy home!
Comments are closed.