Board and Batten Installation A Complete Guide
Board and batten installation offers a timeless and versatile way to enhance your home’s exterior. From classic farmhouse charm to modern minimalist aesthetics, this siding style boasts incredible adaptability. This guide will walk you through every step, from choosing the right materials to mastering the installation techniques, ensuring a beautiful and long-lasting result. We’ll cover everything from planning and preparation to finishing touches and maintenance, equipping you with the knowledge to tackle this project with confidence.
We’ll explore different siding materials – wood, vinyl, fiber cement – weighing their pros and cons, and helping you select the perfect option for your climate and architectural style. Learn how to accurately measure and cut materials, install battens and boards, handle corners and trim, and finish around windows and doors. We’ll even delve into advanced techniques for complex wall surfaces and decorative effects. Get ready to transform your home’s exterior with the enduring appeal of board and batten siding!
Understanding Board and Batten Siding
Source: inspectapedia.com
Board and batten siding offers a classic, timeless look that can enhance the curb appeal of any home. Its simple design, featuring vertical boards and narrower battens covering the seams, creates a clean and elegant aesthetic. However, choosing the right material and style requires careful consideration of several factors.
Board and Batten Siding Materials
The choice of material significantly impacts the longevity, maintenance requirements, and overall cost of your board and batten siding. Three primary materials are commonly used: wood, vinyl, and fiber cement. Each offers unique advantages and disadvantages.
- Wood: Wood siding provides a natural, rustic charm. However, it requires regular maintenance, including painting or staining, to protect it from the elements. Wood is susceptible to rot, insect infestation, and warping if not properly treated and maintained. Cedar, redwood, and pine are popular choices due to their durability and aesthetic qualities. The cost varies greatly depending on the type of wood and its treatment.
- Vinyl: Vinyl siding is a low-maintenance option that’s resistant to rot, insects, and moisture damage. It comes in a wide variety of colors and styles, mimicking the look of wood without the upkeep. However, vinyl can fade over time, and it’s not as durable as fiber cement or high-quality wood. It’s also less environmentally friendly than some other options.
- Fiber Cement: Fiber cement siding combines the durability of cement with the workability of wood. It’s incredibly resistant to fire, moisture, and insect damage, making it a long-lasting and low-maintenance choice. While more expensive upfront than vinyl, its longevity often makes it a cost-effective option in the long run. It can be painted to match any aesthetic preference.
Aesthetic Appeal of Board and Batten Profiles and Styles
The visual impact of board and batten siding depends heavily on the profile and style chosen. The width of the boards and battens, the spacing between them, and the overall color scheme all contribute to the final aesthetic.
A wider board and narrower batten creates a more modern, minimalist look, while narrower boards and wider battens can give a more traditional or rustic feel. The color choice significantly influences the overall impression; lighter colors can make a house appear larger and brighter, while darker colors create a more dramatic and sophisticated appearance. Consider the architectural style of your home when selecting a profile; a farmhouse might suit a wider board and batten profile, while a more contemporary home might benefit from a narrower one.
Selecting Siding Based on Climate and Building Style
Choosing the right board and batten siding involves considering your local climate and the architectural style of your home.
For example, in areas with high humidity and rainfall, fiber cement or treated wood are better choices than untreated wood due to their superior resistance to moisture damage. In areas with extreme temperature fluctuations, vinyl might be a suitable option due to its ability to withstand expansion and contraction. For a traditional craftsman-style home, a wider board and batten profile with a darker stain might be appropriate. In contrast, a contemporary home might look best with a narrower profile and a lighter paint color. Always consider the overall color palette of your home and surrounding landscape to ensure a cohesive and aesthetically pleasing design.
Planning and Preparation for Installation
Getting your board and batten project off to a smooth start relies heavily on thorough planning and preparation. This phase sets the stage for a professional-looking finish and avoids costly mistakes down the line. Taking the time to meticulously prepare your wall surface and plan your layout will significantly impact the outcome.
Exterior Wall Surface Preparation Checklist
Proper preparation of the wall is paramount. A poorly prepped surface will lead to problems with adhesion and an uneven final look. This checklist ensures you cover all the bases before installing your siding.
- Remove Old Siding: Carefully remove any existing siding, paying attention to not damage the underlying sheathing.
- Repair Damaged Sheathing: Replace or repair any damaged or rotten sheathing. This is crucial for a stable and long-lasting installation.
- Clean the Surface: Thoroughly clean the wall surface using a pressure washer or stiff brush to remove dirt, debris, loose paint, and cobwebs. Allow ample drying time.
- Caulk Gaps and Cracks: Fill any gaps or cracks in the sheathing with exterior-grade caulk to create a smooth, continuous surface.
- Prime the Surface (if necessary): If the underlying surface is bare wood or requires improved adhesion, apply a quality exterior primer. This will help the siding adhere properly and prevent moisture issues.
- Inspect for Pests: Check for any signs of insect infestation or damage. Address any issues before proceeding to prevent future problems.
Layout Plan Design
Careful planning of your board and batten layout is essential, especially around windows and doors. A well-thought-out plan will minimize waste and maximize the aesthetic appeal of your finished project.
Consider these factors when designing your layout:
- Window and Door Placement: Plan how the battens will intersect with windows and doors, ensuring a clean and symmetrical look. You may need to cut battens to fit around these features.
- Vertical vs. Horizontal Orientation: Decide whether you want vertical or horizontal battens. Vertical battens can make a wall appear taller, while horizontal battens can create a wider look.
- Batten Spacing: Determine the spacing between your battens. Consistent spacing is key to a professional appearance. Use spacers to maintain even gaps.
- Starting Point: Choose a prominent starting point for your battens, such as a corner or a visually significant feature. This will help guide your installation.
- Corner Treatments: Plan how you will handle corners. Options include mitered corners, L-shaped corners, or using corner trim pieces.
Tools and Equipment
Having the right tools on hand will make the installation process smoother and more efficient. This list includes essential items for a successful board and batten project.
- Measuring Tape: Accurate measurements are crucial for cutting the siding to the correct lengths.
- Level: Ensures your battens are installed perfectly straight and plumb.
- Circular Saw or Miter Saw: For accurately cutting the siding to length and creating mitered corners.
- Nail Gun (optional but recommended): Significantly speeds up the installation process and provides consistent nailing.
- Hammer: For hand nailing if not using a nail gun.
- Safety Glasses and Gloves: Essential for protecting your eyes and hands during the project.
- Caulk Gun: For applying caulk around windows, doors, and other areas.
- Spacers: Maintain consistent spacing between battens.
- Jigsaw (optional): Useful for cutting intricate shapes or curves.
Measuring and Cutting Siding Materials
Accurate measuring and cutting are essential for a professional-looking installation. Inaccurate cuts will be immediately noticeable and detract from the overall appearance.
- Precise Measurements: Always double-check your measurements before cutting. Measure twice, cut once is a good rule to follow.
- Use a Sharp Blade: A dull blade will result in ragged cuts. Replace blades regularly for clean, precise cuts.
- Support the Material: Ensure the siding is securely supported while cutting to prevent chipping or splintering.
- Miter Cuts: For corners, use a miter saw to create precise 45-degree angle cuts for a clean, professional finish.
- Test Cuts: Before cutting a large number of pieces, make a test cut to ensure your settings are correct and you are achieving the desired results.
Installation Techniques and Procedures: Board And Batten Installation

Source: cabindiy.com
Installing board and batten siding is a rewarding DIY project that can significantly enhance your home’s curb appeal. This section details the step-by-step process, focusing on techniques for achieving a professional-looking finish. Remember to always consult your specific siding manufacturer’s instructions for best results.
Vertical Batten Installation
Begin by installing the vertical battens, which provide a framework for the horizontal boards. These battens should be spaced evenly according to your design plan – typically 16 inches on center, but this can vary. Use a level to ensure vertical alignment. Secure the battens to the house’s framing using appropriate exterior-grade screws, countersinking them slightly and covering the screw heads with wood filler for a smooth finish. Pre-drilling pilot holes is recommended to prevent splitting the wood. For added durability, consider using galvanized nails or stainless steel screws, especially in areas exposed to moisture.
Horizontal Board Installation
With the battens in place, you’re ready for the horizontal boards. Start at the bottom, ensuring the first board is level. Overlap each subsequent board by at least 1 inch to create a weatherproof barrier. Use exterior-grade nails or screws, again pre-drilling to prevent splitting. Maintain consistent spacing between boards. A nail gun can speed up this process significantly, but careful alignment remains crucial. It’s advisable to work in sections, ensuring each section is perfectly aligned before moving to the next.
Corner Board and Trim Installation, Board and batten installation
Corner boards provide a clean, finished look at the exterior corners of your home. These boards should be mitered at a 45-degree angle for a seamless transition. Use a miter saw for accurate cuts. Secure them to the battens using exterior-grade fasteners. Trim pieces, such as those used around windows and doors, should be cut to fit precisely and installed using similar techniques. Always ensure proper alignment and a tight fit to prevent water infiltration. Caulk all joints to further enhance weather resistance.
Window and Door Finishing
Finishing around windows and doors requires careful measurement and precise cuts. Use trim pieces that match your siding’s style. Remember to allow for expansion and contraction due to temperature changes. Use exterior-grade caulk to seal the gaps between the trim and the window or door frame, creating a weathertight seal. Pre-painting or priming the trim before installation can save time and effort.
| Stage | Materials Needed | Steps | Potential Challenges |
|---|---|---|---|
| Vertical Batten Installation | Battens, exterior-grade screws/nails, level, drill, wood filler | 1. Space battens evenly. 2. Ensure vertical alignment. 3. Secure battens to framing. 4. Countersink fasteners and fill holes. | Maintaining consistent spacing, ensuring vertical alignment, preventing wood splitting. |
| Horizontal Board Installation | Horizontal boards, exterior-grade screws/nails, nail gun (optional), level | 1. Start at bottom, ensure level. 2. Overlap boards. 3. Secure boards to battens. 4. Maintain consistent spacing. | Maintaining consistent overlap, preventing gaps, ensuring straight lines. |
| Corner Board and Trim Installation | Corner boards, trim pieces, miter saw, exterior-grade fasteners, caulk | 1. Miter corner boards at 45 degrees. 2. Secure to battens. 3. Cut and install trim pieces. 4. Caulk all joints. | Accurate miter cuts, ensuring tight fit, preventing gaps. |
| Window and Door Finishing | Trim pieces, caulk, measuring tools, saw | 1. Measure and cut trim to fit. 2. Install trim around windows and doors. 3. Caulk gaps between trim and frame. | Accurate measurements, precise cuts, ensuring a weathertight seal. |
Finishing Touches and Maintenance
You’ve successfully installed your board and batten siding! Now it’s time to focus on the details that will protect your investment and ensure its beauty for years to come. Proper sealing, painting, and regular maintenance are key to achieving a long-lasting, weather-resistant finish.
Caulking and Sealing Methods
Effective caulking is crucial for weatherproofing your board and batten installation. This prevents water penetration, which can lead to rot, mold, and other damage. Several caulking types are suitable, each with its strengths and weaknesses. Exterior-grade acrylic latex caulk is a popular choice for its flexibility, ease of application, and paintability. It’s ideal for filling gaps and sealing joints between boards and around windows and doors. Silicone caulk offers superior water resistance but is less paintable and can be more difficult to work with. Consider using silicone in areas exposed to constant moisture, such as around window frames. Always follow the manufacturer’s instructions for application and curing time. Ensure a consistent bead and smooth any excess caulk for a clean finish.
Painting or Staining Board and Batten Siding
Choosing between paint and stain depends on personal preference and the desired aesthetic. Paint provides a durable, opaque finish that protects the wood from the elements. It offers a wide range of color options and is relatively easy to apply. Ensure you use a high-quality exterior-grade paint formulated for wood siding. Multiple coats are generally recommended for optimal protection and color depth. Stain, on the other hand, penetrates the wood, enhancing its natural grain and texture. It allows the wood’s natural beauty to show through while still offering protection from the elements. Stain requires more frequent reapplication than paint but offers a more natural look. Regardless of your choice, proper surface preparation is crucial. Clean the siding thoroughly, sand any rough spots, and prime the wood before applying paint or stain. Follow the manufacturer’s instructions for drying times between coats.
Board and Batten Siding Maintenance Schedule
Regular maintenance is vital to preserving the integrity and appearance of your board and batten siding. A yearly inspection is recommended to identify and address any minor damage or issues promptly. This includes checking for loose boards, damaged caulking, signs of rot or insect infestation, and any paint or stain deterioration. Cleaning the siding annually with a pressure washer (using a low-pressure setting to avoid damage) will remove dirt, grime, and loose debris. Re-caulking and repainting or restaining should be done as needed, usually every 3-5 years depending on the climate and the type of finish used. Addressing minor issues promptly prevents them from escalating into larger, more costly repairs. For example, a small crack in the caulking should be repaired immediately to prevent water intrusion.
Repairing Minor Damage
Minor damage, such as small cracks or loose boards, can usually be repaired relatively easily. For loose boards, carefully remove the affected board and reattach it using appropriate fasteners. Small cracks can be filled with wood filler, sanded smooth, and then repainted or stained to match the surrounding area. For more significant damage, it might be necessary to replace the affected section of siding. Always use high-quality materials and techniques to ensure a lasting repair. Consider consulting a professional for larger repairs or if you are unsure about how to proceed. A proactive approach to maintenance will extend the lifespan of your board and batten siding and maintain its attractive appearance for many years.
Advanced Installation Techniques

Source: cabindiy.com
Taking on a board and batten project on complex surfaces or with unique design elements requires a bit more finesse. This section covers advanced techniques to ensure a professional-looking and durable finish, even on challenging projects. We’ll explore methods for tackling curves, creating striking shadow lines, and choosing the right fasteners for longevity. Finally, we’ll address moisture management, a critical aspect of siding longevity.
Board and Batten on Curved Walls
Installing board and batten siding on curved walls requires pre-bending the boards to match the contour. This is often done by carefully soaking the wood in water to increase its flexibility. The degree of soaking and bending will depend on the wood species and the radius of the curve. Once pliable, the boards are carefully bent and secured to the framing using appropriately spaced fasteners, ensuring that the boards don’t crack or split under the stress. It’s crucial to use thin, flexible fasteners and to pre-drill holes to avoid splitting the wood. For tighter curves, you might need to use multiple narrower boards to achieve a smooth, consistent curve. Consider using a flexible adhesive in addition to fasteners to improve the bond and reduce the risk of movement over time.
Creating Shadow Lines and Decorative Effects
Shadow lines add depth and visual interest to board and batten siding. These are created by strategically varying the width of the battens or by adding thin strips of trim between the boards. For example, using a slightly wider batten below a narrower one creates a distinct shadow line, while thinner strips of trim can be installed to create a more pronounced or decorative effect. Experimenting with different widths and using contrasting colors can produce visually striking results. Precise cuts and consistent spacing are essential for a professional look. Careful planning and layout are crucial to achieve the desired effect. Remember to consider the overall design of the house and the surrounding environment when choosing the design and color scheme.
Fastening Methods for Improved Durability
The choice of fasteners significantly impacts the longevity and durability of your board and batten siding. While nails are a common choice, screws offer superior holding power and resistance to wind uplift, particularly important in areas prone to high winds. Exterior-grade screws with a corrosion-resistant coating are recommended. Pre-drilling pilot holes prevents splitting, especially in harder wood species. The spacing of fasteners should be consistent and conform to manufacturer’s recommendations. Using a combination of nails and screws can offer an even more robust fastening system. Consider using stainless steel fasteners for added corrosion resistance in coastal or high-humidity environments.
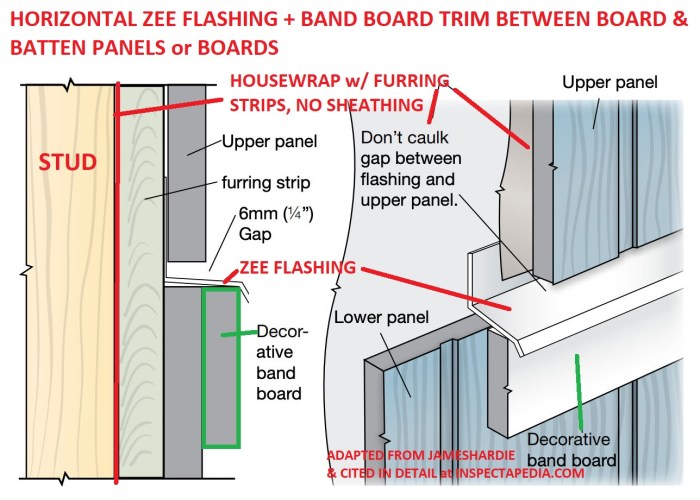
Moisture and Ventilation System
Proper moisture management is vital for preventing rot and mold behind board and batten siding. This requires a well-ventilated system that allows air to circulate freely. This is often achieved by creating a gap between the siding and the house’s sheathing, using appropriate flashing around windows and doors, and installing vents at the bottom and top of the wall assembly. A moisture barrier, such as a housewrap, should be installed under the siding to prevent moisture from penetrating the wall cavity. Adequate ventilation helps to dry out any moisture that does penetrate the barrier, preventing the build-up of moisture and ensuring the longevity of the siding. Proper drainage away from the house’s foundation is also essential to prevent moisture from accumulating near the bottom of the siding.
Visual Examples and Illustrations

Source: b-cdn.net
Board and batten siding offers a remarkable versatility in its visual appeal, adaptable to a wide range of architectural styles and personal preferences. The interplay of color, finish, lighting, and material choices significantly impacts the final aesthetic. Let’s explore how these elements contribute to the overall look and feel of a board and batten installation.
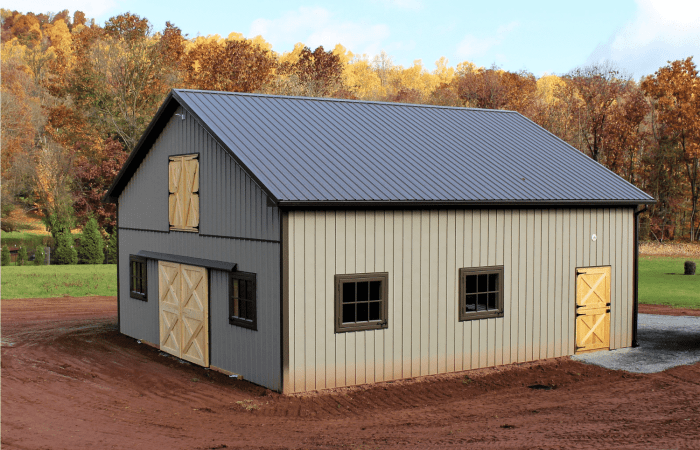
Board and Batten on Different Architectural Styles
Board and batten’s inherent charm makes it a fitting choice for various architectural styles. On a farmhouse, the vertical lines of the siding create a sense of rustic elegance, complementing the home’s traditional features. The clean lines and simple design perfectly capture the essence of a farmhouse aesthetic. In contrast, a Craftsman-style home benefits from board and batten’s ability to incorporate intricate detailing, such as wider battens or contrasting colors, echoing the style’s emphasis on handcrafted elements. The use of natural wood tones and earthier color palettes enhances the Craftsman feel. Modern homes can also embrace board and batten, particularly with sleek, minimalist designs. Here, a monochromatic color scheme, perhaps with a dark gray or black finish, can create a contemporary and sophisticated look, showcasing the siding’s clean lines and geometric pattern. The simplicity of the design allows the architecture to shine.
Visual Impact of Color Choices and Paint Finishes
Color significantly influences the overall mood and feel of a board and batten installation. A light, neutral palette, such as creamy whites or soft grays, creates a bright and airy atmosphere, making the home appear larger and more inviting. Conversely, darker colors, like deep blues, greens, or blacks, provide a dramatic and sophisticated contrast, creating a sense of warmth and coziness. The choice of paint finish further impacts the visual effect. A matte finish offers a subtle, understated elegance, while a semi-gloss finish provides a more polished and modern look. A high-gloss finish offers a dramatic, reflective quality, emphasizing the texture of the wood and enhancing the light play across the surface. For example, a high-gloss white board and batten on a modern home could create a stunning, almost futuristic effect.
Lighting’s Influence on Board and Batten
Natural and artificial lighting play a crucial role in highlighting the texture and color of board and batten siding. Sunlight accentuates the shadows created by the vertical lines, emphasizing the three-dimensional quality of the siding. The angle of the sun throughout the day will subtly change the appearance of the siding. During the golden hour, for instance, a warm, golden light washes over the surface, creating a particularly inviting ambiance. Artificial lighting, such as strategically placed spotlights or path lights, can be used to highlight specific architectural details or create a dramatic nighttime effect. Consider using warm-toned lighting to complement the natural wood tones of the siding, enhancing the overall ambiance.
A Visually Appealing Board and Batten Installation
Imagine a two-story Craftsman-style home clad in wide, stained cedar board and batten. The cedar’s natural reddish-brown hue is enhanced by a semi-transparent stain that allows the wood grain to show through. The wider battens, spaced approximately 6 inches apart, create a striking visual rhythm, emphasizing the vertical lines. The deep eaves and exposed rafter tails of the Craftsman style are further accentuated by the siding’s texture and color. Simple, black window frames and a dark gray front door provide a sophisticated contrast against the warmer tones of the siding. Landscaping that incorporates native plants and stone pathways complements the home’s rustic charm. The overall effect is one of understated elegance, warmth, and timeless appeal. This example demonstrates how careful material selection and design elements can transform board and batten from a simple siding choice into a statement piece that enhances the architectural character of the home.
Wrap-Up
Mastering board and batten installation is a rewarding experience, transforming your home’s curb appeal and adding significant value. By following the steps outlined in this guide, you’ll be equipped to tackle this project successfully, whether you’re a seasoned DIYer or a first-timer. Remember to prioritize careful planning, precise measurements, and attention to detail throughout the process. With the right preparation and technique, you can enjoy the beauty and durability of board and batten siding for years to come. So, grab your tools, and let’s get started!
Comments are closed.