Price to Replace Vinyl Siding and Siding
Price to replace vinyl siding and siding – Price to replace vinyl siding and siding? It’s a bigger project than you might think! This guide breaks down the costs, compares different siding options, and walks you through the entire process from choosing a contractor to enjoying your beautiful new exterior. We’ll cover everything from material costs and labor to the long-term value of various siding types, helping you make informed decisions for your home improvement project.
Understanding the price to replace your vinyl siding involves considering many factors. This includes the size of your home, the type of siding you choose (standard, premium, insulated), your location (labor and material costs vary geographically), and any necessary permits and disposal fees. We’ll explore these factors in detail, offering cost estimates and comparisons to help you budget effectively.
Cost Factors Influencing Vinyl Siding Replacement
Source: yourhousehelper.com
Replacing your vinyl siding is a significant investment, and understanding the factors that influence the final cost is crucial for budgeting and planning. Several key elements contribute to the overall expense, ranging from the type of siding chosen to the size of the project and your geographic location. Let’s break down these factors to help you better understand what to expect.
Labor Costs
Labor costs represent a significant portion of the total expense. The complexity of the job, the size of your house, and the experience level of the contractor all play a role. A simple repair might involve a few hours of labor, while a full house replacement could take several days or even weeks, depending on the size and intricacy of the project. Contractors typically charge by the hour or per square foot, and their rates can vary widely based on their location and reputation. For instance, a highly experienced and reputable contractor in a high-demand area will likely charge more than a smaller, less established company.
Material Costs
The cost of vinyl siding itself varies considerably depending on the type and quality. Standard vinyl siding is the most economical option, offering a balance of affordability and durability. Premium vinyl siding, often featuring thicker material, enhanced color stability, and improved resistance to impact and fading, commands a higher price. Insulated vinyl siding, incorporating a foam backing for added insulation, is the most expensive option but offers significant energy savings over time. The price per square foot can range from a few dollars for standard siding to upwards of $10 or more for premium insulated options. The total material cost will be determined by the surface area of your home requiring replacement.
Permitting Costs
Most localities require permits for exterior home renovations, including vinyl siding replacement. Permitting costs vary significantly depending on your location and the scope of the project. Some areas may have relatively low fees, while others may charge substantially more. It’s essential to factor these costs into your budget early in the planning process. Failure to obtain the necessary permits can result in fines or even legal issues.
Disposal Costs
Removing and disposing of old vinyl siding adds to the overall project cost. Contractors typically include disposal fees in their quotes, but it’s always a good idea to clarify these charges upfront. The disposal costs will depend on the amount of siding being removed and local regulations regarding waste disposal. Some areas have strict regulations and fees associated with disposing of construction waste.
Geographic Location Impact on Pricing
The cost of vinyl siding replacement can vary significantly based on geographic location. Labor rates, material costs, and permit fees are all influenced by regional factors. For example, areas with high construction costs and a high demand for contractors will generally have higher prices than areas with lower labor costs and less competition. A replacement project in a major metropolitan area will likely cost more than a similar project in a rural area.
Price Ranges for Different Siding Replacement Scenarios
| Scenario | Labor Cost Range | Material Cost Range | Total Cost Range |
|---|---|---|---|
| Small Repair (e.g., single damaged panel) | $50 – $200 | $20 – $100 | $70 – $300 |
| Partial House Replacement (e.g., one side of house) | $1,000 – $5,000 | $500 – $2,500 | $1,500 – $7,500 |
| Full House Replacement | $5,000 – $20,000 | $2,500 – $10,000 | $7,500 – $30,000 |
Comparing Vinyl Siding to Other Siding Materials
Choosing the right siding for your home is a significant decision, impacting both aesthetics and your wallet. While vinyl siding is a popular and affordable option, it’s crucial to weigh its pros and cons against other materials to determine the best long-term value for your investment. This section will compare vinyl siding with wood, fiber cement, and aluminum siding, considering initial costs, maintenance needs, and overall lifespan.
Let’s dive into a cost comparison of different siding materials. Remember that pricing can fluctuate based on location, labor costs, and the complexity of the installation. These are general estimates to give you a better understanding.
Cost Comparison of Siding Materials
The initial cost of siding materials varies considerably. While vinyl is often the most budget-friendly upfront, the long-term picture changes when you factor in maintenance and replacement cycles.
- Vinyl Siding: Generally the least expensive upfront, offering a relatively low initial investment.
- Wood Siding: More expensive than vinyl initially, with costs varying widely depending on the wood type (e.g., cedar, redwood) and quality.
- Fiber Cement Siding: Typically falls between vinyl and wood in terms of initial cost, offering a good balance of affordability and durability.
- Aluminum Siding: Comparable in initial cost to vinyl, though prices can increase with features like higher-quality finishes.
Long-Term Cost-Effectiveness
The true cost of siding goes beyond the initial purchase price. Maintenance requirements and lifespan significantly impact long-term expenses. Let’s examine each material’s long-term cost-effectiveness.
For instance, while vinyl requires minimal maintenance, it may need replacement sooner than other materials. Wood, on the other hand, demands regular painting or staining to prevent rot and insect damage, adding to the overall cost. Fiber cement, known for its durability, requires less frequent maintenance but may be more expensive to repair if damaged. Aluminum siding is relatively low-maintenance but can be susceptible to dents and scratches.
Initial Investment vs. Long-Term Savings
A crucial aspect of siding selection involves balancing initial investment with long-term savings. While vinyl’s low upfront cost is attractive, its shorter lifespan means you’ll likely face replacement costs sooner than with more durable options like fiber cement.
Consider a scenario where you choose vinyl siding with an initial cost of $10,000 and an expected lifespan of 20 years. If you need to replace it twice over 40 years, your total cost would be $30,000. Compare this to fiber cement siding with an initial cost of $15,000 and a lifespan of 50 years. Over the same 40-year period, your total cost is significantly less.
Lifespan and Average Maintenance Costs
This table summarizes the estimated lifespan and average annual maintenance costs for each siding material. These are estimates and can vary based on factors such as climate, quality of installation, and maintenance practices.
| Siding Material | Estimated Lifespan (Years) | Average Annual Maintenance Cost (Estimate) | Notes |
|---|---|---|---|
| Vinyl | 20-30 | $50-$100 | Minimal maintenance; occasional cleaning |
| Wood | 30-50+ | $200-$500+ | Requires regular painting/staining, potential for repairs |
| Fiber Cement | 50+ | $50-$150 | Low maintenance; occasional cleaning and repainting |
| Aluminum | 40-50 | $100-$200 | Relatively low maintenance; occasional cleaning and minor repairs |
The Siding Replacement Process
Source: peakcustomremodeling.com
Replacing your vinyl siding is a significant undertaking, but with careful planning and execution, you can achieve a beautiful and long-lasting result. This step-by-step guide will walk you through the process, from initial assessment to final cleanup, highlighting crucial considerations at each stage. Remember, for large or complex projects, hiring a professional is always recommended.
Pre-Project Preparation and Assessment, Price to replace vinyl siding and siding
Before any demolition begins, a thorough assessment is vital. This involves carefully inspecting the existing siding to identify the extent of damage, noting any underlying issues like rotted wood or insect infestation. You’ll need to measure the house’s perimeter to determine the quantity of new siding needed. This also includes checking for any local building codes or permits that might be required for the project. Tools needed at this stage are a measuring tape, a notepad, and a camera to document the existing condition. Potential challenges include discovering unexpected structural problems requiring additional repairs or delays. For instance, you might uncover significant water damage behind the siding, necessitating repairs before new siding can be installed.
Removal of Existing Siding
This stage involves carefully removing the old vinyl siding. Start by removing any trim pieces, such as corner boards or J-channels. Then, begin removing the siding panels, working from the bottom up. Use a pry bar to gently loosen the panels, taking care not to damage the underlying sheathing. Tools needed include a pry bar, hammer, utility knife, and safety glasses. A common complication is encountering stubborn or damaged panels that are difficult to remove without causing damage to the underlying structure. For example, panels that have been improperly installed or have been exposed to extreme weather conditions might be more challenging to remove.
Sheathing Inspection and Repair
Once the old siding is removed, thoroughly inspect the house’s sheathing (the material underneath the siding). Look for any rot, damage, or insect infestation. Repair or replace any damaged areas before installing the new siding. Tools needed include a hammer, nails, wood filler, and possibly a saw for replacing damaged sections. Challenges here include discovering extensive rot or water damage, which could significantly increase the project’s scope and cost. For example, extensive rot might necessitate replacing large sections of the sheathing, adding considerable time and expense to the project.
Installation of New Vinyl Siding
Begin installing the new siding at the bottom of the house, working your way up. Ensure proper alignment and overlap of each panel. Use appropriate fasteners and follow the manufacturer’s instructions for installation. Tools needed include a nail gun (or hammer and nails), a level, and measuring tape. Complications might include issues with panel alignment, causing gaps or unevenness in the finished look. For instance, uneven walls or improperly measured cuts can lead to noticeable imperfections.
Installation of Trim and Accessories
Once the siding is installed, install the trim pieces, such as corner boards, J-channels, and window and door trim. Ensure a neat and professional finish. Tools needed include a miter saw (for cutting trim), a level, and caulk. Challenges include precisely cutting and fitting the trim pieces to ensure a tight and watertight seal. For instance, improperly mitered corners can lead to leaks and unsightly gaps.
Final Cleanup
After the installation is complete, thoroughly clean up the work area, removing any debris, leftover materials, and discarded siding. Tools needed include a broom, dustpan, and trash bags. A potential challenge is disposing of the old siding properly, ensuring compliance with local waste disposal regulations. For example, some areas might require special disposal methods for vinyl siding.
Finding and Hiring a Qualified Contractor: Price to Replace Vinyl Siding and Siding

Source: thehaystackneedleonline.com
Replacing your vinyl siding is a significant investment, so choosing the right contractor is crucial for a successful project. A poorly chosen contractor can lead to shoddy workmanship, cost overruns, and lengthy delays. This section will guide you through the process of finding and hiring a qualified professional for your vinyl siding replacement.
Finding a reputable contractor involves careful consideration of several key factors. These factors will help you narrow down your options and ultimately select the best person for the job. It’s important to remember that the lowest bid isn’t always the best deal; experience, licensing, and insurance are equally important considerations.
Contractor Qualifications and Experience
Before contacting any contractor, verify their licensing and insurance. Licensing ensures they meet minimum standards of competency, while insurance protects you from liability in case of accidents or damages during the project. Check online reviews and ask for references to gauge their reputation and past performance. Look for contractors with extensive experience in vinyl siding installation and replacement, ideally with a portfolio of completed projects similar in scope to yours. Experience translates to efficiency, quality, and problem-solving skills. For example, a contractor with 15 years of experience likely possesses a deeper understanding of various siding types and potential challenges than a newer contractor.
Questions to Ask Potential Contractors
It’s vital to ask detailed questions to assess a contractor’s suitability. This ensures transparency and helps you make an informed decision. A willingness to answer your questions thoroughly demonstrates professionalism and commitment to customer satisfaction.
- How long have you been in business, and what is your experience with vinyl siding replacement specifically?
- Are you licensed and insured? Please provide copies of your licenses and insurance certificates.
- Can you provide references from previous clients, and may I contact them?
- What is your process for handling unexpected issues or changes during the project?
- What type of warranty do you offer on your workmanship and materials?
- Can you provide a detailed, itemized written estimate that includes all costs, materials, and labor?
- What is your payment schedule, and what are your policies regarding change orders?
- What is your timeline for completing the project?
Obtaining and Comparing Multiple Bids
Getting multiple bids from different contractors is essential for fair price comparison. This competitive process allows you to compare not only the price but also the scope of work, proposed timelines, and warranties. Remember to ensure that all bids are based on the same specifications and materials to enable a true apples-to-apples comparison. For example, if one bid includes premium-grade vinyl siding while another uses a cheaper alternative, the price difference might not be directly comparable.
Avoiding Scams and Ensuring a Fair Price
Beware of contractors who pressure you into making quick decisions or who request significant upfront payments without a clear contract. A reputable contractor will provide a detailed written contract outlining the scope of work, payment schedule, and warranty. Always verify the contractor’s identity and credentials before signing any contract. If a price seems too good to be true, it probably is. A fair price reflects the cost of materials, labor, overhead, and profit margin, and it should be in line with industry standards. Online resources and local home improvement associations can help you establish a reasonable price range for your project. For instance, a reputable contractor might use industry standard pricing guides or offer a breakdown of costs for different aspects of the project, including material costs, labor hours, and potential permits.
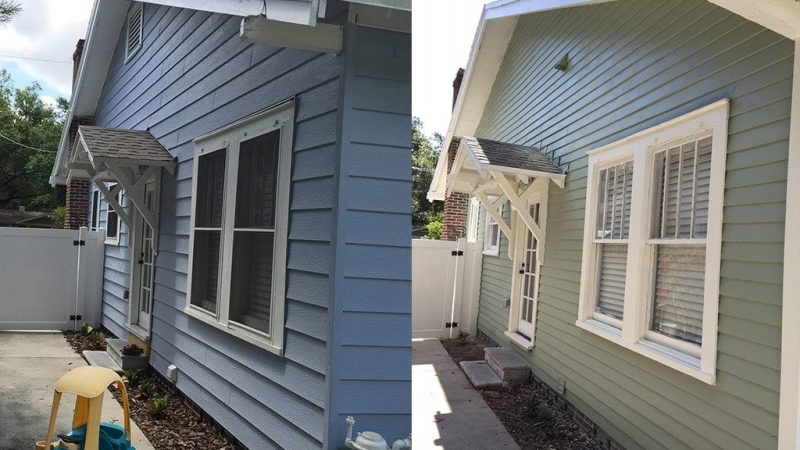
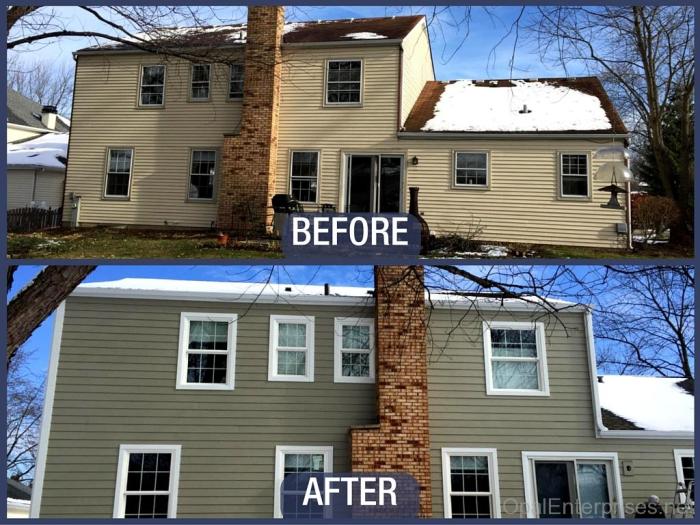
Visual Representation of Siding Replacement
A picture is worth a thousand words, and this is especially true when it comes to visualizing the transformative power of vinyl siding replacement. Seeing a before-and-after comparison can significantly impact a homeowner’s decision-making process, allowing them to fully grasp the potential aesthetic upgrade for their property. Let’s explore how visual representations can help understand the impact of this home improvement project.
Before-and-after scenarios showcase the dramatic difference new siding can make. Imagine a house with faded, cracked, and discolored beige siding, showing signs of age and weathering. The gutters might be stained, and the overall impression is one of neglect. The before picture would capture this, highlighting the dull colors and uneven texture. The after picture, however, would reveal a vibrant transformation. Perhaps a deep, rich navy blue siding now covers the house, complemented by crisp white trim. The new siding’s smooth, even texture contrasts sharply with the old, creating a clean, modern look. The gutters are also freshly painted, completing the revitalized appearance. The overall aesthetic improvement is striking, instantly enhancing the home’s curb appeal and market value.
Visual Impact of Siding Styles and Colors
Different siding styles and colors dramatically alter a house’s exterior appearance. A Craftsman-style home might benefit from horizontal lap siding in a warm earth tone, like a deep brown or terracotta, to emphasize its traditional lines. Conversely, a modern farmhouse might look stunning with vertical board-and-batten siding in a clean white or light gray, enhancing its sleek, contemporary design. Color choice is equally crucial. Darker colors, like navy blue or charcoal gray, can make a house appear more imposing and substantial, while lighter colors, such as cream or pale yellow, create a sense of airiness and spaciousness. Bold accent colors on trim or shutters can add personality and visual interest, breaking up large expanses of siding and drawing the eye to specific architectural details. For example, a bright red door against a neutral siding backdrop can create a welcoming and eye-catching focal point.
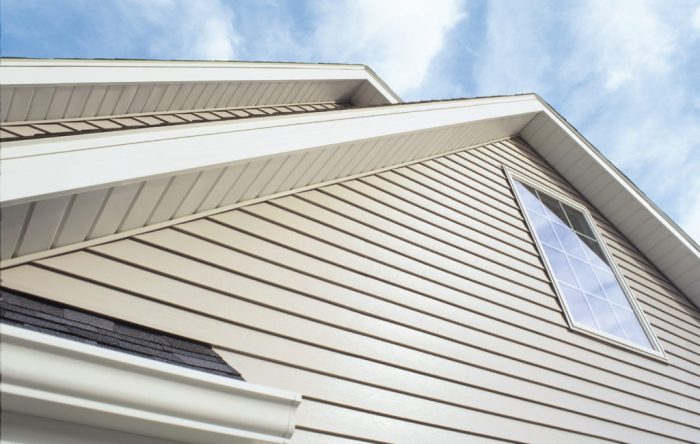
Visual Differences Between High-Quality and Low-Quality Vinyl Siding Installations
The difference between a high-quality and low-quality vinyl siding installation is immediately apparent upon visual inspection. High-quality installations showcase perfectly aligned panels with consistent spacing and even seams. The edges of the panels fit together seamlessly, creating a smooth, unbroken surface. The overall look is professional and polished, with no visible gaps or inconsistencies. In contrast, a low-quality installation may exhibit noticeable gaps between panels, uneven seams, and poorly cut edges. The panels might be slightly misaligned, creating an unprofessional and unfinished appearance. Furthermore, a high-quality installation will feature properly installed flashing and trim, ensuring water doesn’t penetrate behind the siding. Low-quality installations may lack adequate flashing, increasing the risk of water damage and leading to future problems. The difference is clear; a high-quality installation looks like a seamless, unified whole, while a low-quality one looks patched together and unfinished.
Epilogue

Source: universalwindowsdirect.com
Replacing your siding is a significant investment, but with careful planning and the right information, you can achieve a stunning transformation for your home while staying within budget. Remember to get multiple quotes from reputable contractors, weigh the long-term costs and benefits of different siding materials, and thoroughly understand the entire process before starting. By following the steps outlined here, you can confidently navigate the project and enjoy a beautiful, long-lasting result.
Comments are closed.